Extremely Serious

Category: Powershell (Page 2 of 2)

Sample Show Balloon Notification for PowerShell

A sample implementation of windows balloon notification for powershell is as follows:

Add-Type -AssemblyName System.Windows.Forms

function FnShowBalloon {

    [CmdLetBinding()]
    param($title, 
           $message, 
           [string] $icon = 'info', 
           [int] $delay = 20000, 
           [int] $sleep=0)

    Switch($icon.ToString().ToLower()) {
        'warn' {$iconInstance = [System.Windows.Forms.ToolTipIcon]::Warning}
        'error' {$iconInstance = [System.Windows.Forms.ToolTipIcon]::Error}
        'info' {$iconInstance = [System.Windows.Forms.ToolTipIcon]::Info}
        default {$iconInstance = [System.Windows.Forms.ToolTipIcon]::None}
    }

    $notification = New-Object System.Windows.Forms.NotifyIcon
    $path = (Get-Process -id $pid).Path
    $notification.Icon = [System.Drawing.Icon]::ExtractAssociatedIcon($path)
    $notification.BalloonTipIcon = $iconInstance
    $notification.BalloonTipTitle = $title
    $notification.BalloonTipText = $message
    $notification.Visible = $true
    $notification.ShowBalloonTip($delay)

    if ($sleep -gt 0) {
        Start-Sleep -s $sleep
        $notification.Dispose()
    }
}

The FnShowBalloon  function can be used as follows:

FnShowBalloon -title "Hello World" -message "This is a sample message" -icon info
Recommended Way to Redirect the Output to a Text File in PowerShell

Instead of using > to redirect the output into a file, pipe it to out-file cmdlet.

The out-file cmdlet allows some useful parameters as follows:

Parameter Argument Description
-Append Adds the output to the end of an existing file.
-Encoding Encoding Specifies the type of encoding for the target file. The default value is utf8NoBOM.

The acceptable values for this parameter are as follows:

ascii: Uses the encoding for the ASCII (7-bit) character set.
bigendianunicode: Encodes in UTF-16 format using the big-endian byte order.
oem: Uses the default encoding for MS-DOS and console programs.
unicode: Encodes in UTF-16 format using the little-endian byte order.
utf7: Encodes in UTF-7 format.
utf8: Encodes in UTF-8 format.
utf8BOM: Encodes in UTF-8 format with Byte Order Mark (BOM)
utf8NoBOM: Encodes in UTF-8 format without Byte Order Mark (BOM)
utf32: Encodes in UTF-32 format.

-FilePath Path Specifies the path to the output file.

To redirecting the output of the dir command to dir.txt file, use the following command:

dir | out-file -encoding ascii -filepath "dir.txt"

Enable Windows Subsystem for Linux (WSL) and Install Linux Distribution

If you want to install any Linux distributions for WSL ensure that the Microsoft-Windows-Subsystem-Linux optional feature is enabled using the following procedure:

  1. Open a PowerShell as Administrator and run the following (i.e. if it is not installed):
    Enable-WindowsOptionalFeature -Online -FeatureName Microsoft-Windows-Subsystem-Linux
  2. Restart the computer when prompted.
  3. Open the Microsoft Store
  4. Search for the Linux distribution (e.g. Ubuntu) you like.
  5. Click it and the click the Install button.
  6. After finishing the installation search for it in the Start menu.

    Usually the newly installed application is at the top of the start menu.

Make the Target Folder always in-sync from the Source Folder using Beyond Compare

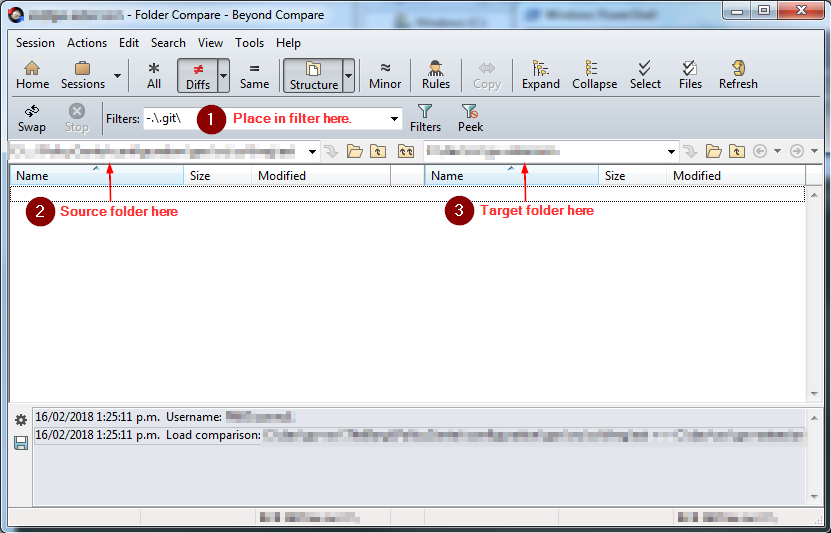
  1. Create a folder compare session with beyond compare like the following:
  2. Save the session with a file name without any special characters (e.g. < or >) or spaces (i.e. necessary not to confuse the scheduler).
  3. Save the following beyond compare script to right-updater.bc file.
    #Write to right-updater.log
    log normal "right-updater.log"
    
    #Load a folder compare session.
    load "%1"
    
    #Confirmation will be set to yes by default. 
    option confirm:yes-to-all
    
    #Make the right equals to the left of the loaded folder from the session.
    sync mirror:left->right
  4. Save the following powershell script to bcrunner.ps1 file along the side right-updater.bc file.
    #expects 2 command line parameters
    param([string]$script, [string]$session)
    
    #The beyond compare command to be used.
    $cmd="C:\Program Files\Beyond Compare 4\BComp.com"
    
    #Holds the session argument for the beyond compare command.
    $args="""$session"""
    
    #Write on screen the actual command to be executed.
    write-output "$cmd /silent @$script $args"
    
    #Perform the command.
    &$cmd /silent @$script $args
  5. Schedule using windows task scheduler and on the actions tab fill in the following fields like:
    Action Start a program
    Program/script powershell
    Add arguments(optional) ./bcrunner.ps1 right-updater.bc <SAVED_SESSION_FROM_STEP_2>
    Start in (optional) <DIRECTORY_OF_BCRUNNER.PS1_FILE_FROM_STEP_4>

    Note: Fill-in the other tabs of the scheduler accordingly.

Preparing Your Powershell Profile for Editing

  1. Execute the following to check the PROFILE variable:
    Get-Variable | Where-Object {$_.Name -like "PROFILE"}
  2. Test if its actually existing on the disk using the following command:
    Test-Path $PROFILE

    This will return True if the profile is already existing on the disk and ready for editing. If this returns False execute the following command:

    New-Item -Path $PROFILE -ItemType "file" -Force

Install Jabba in Powershell behind proxy

Jabba is a java version manager (see https://github.com/shyiko/jabbathat simplifies the installation and switching of/to different JDK.

If your powershell is behind the firewall follow the procedure here.

Install Jabba using the following cmdlet:

Note: If you encountered something like jabba.ps1 cannot be loaded because running scripts is disabled on this system. For
more information, see about_Execution_Policies at http://go.microsoft.com/fwlink/?LinkID=135170 see running unsigned script.

Invoke-Expression (
        wget https://github.com/shyiko/jabba/raw/master/install.ps1 -UseBasicParsing
    ).Content

Running Unsigned Script Temporarily in Powershell

  1. Get the current execution policy using the following command and remember it:
    Get-ExecutionPolicy
  2. Set the execution policy to unrestricted using the following command:
    Set-ExecutionPolicy -Scope CurrentUser -ExecutionPolicy Unrestricted
  3. Execute the unsigned script.
  4. Return the back execution policy to what it was (i.e. from step 1). Using the following command syntax similar to step 2:

    Note: This is not required if you know that you are only running the script that you trust.

    Set-ExecutionPolicy -Scope CurrentUser -ExecutionPolicy <EXECUTION_POLICY_FROM_STEP1>

Powershell Behind Proxy

Using the default network credentials

(New-Object System.Net.WebClient).Proxy.Credentials = [System.Net.CredentialCache]::DefaultNetworkCredentials

Using a different credentials

Using Get-Credential

(New-Object System.Net.WebClient).Proxy.Credentials = Get-Credential

Using NetworkCredential Object

(New-Object System.Net.WebClient).Proxy.Credentials = New-Object System.Net.NetworkCredential(<username>, <password>)

Note: You can add any one of these to your powershell profile to allow it to have network connectivity by default using proxy.

Newer posts »