Extremely Serious

Month: March 2018

Resetting GitHub Forked Master with Upstream Master Branch

If your GitHub forked master branch is ahead from the upstream's master branch and you wanted to make it even (i.e. also lose some work). The following procedure might help you.

Note: If you have your default branch protected perform steps 1, 2, 3, 7, 8 and 9.  Otherwise just do steps 4, 5 and 6.

  1. Open a terminal (i.e. powershell, cmd, bash) and checkout the master of the upstream to a temporary branch (i.e. this could be anything) using the following syntax:
    git checkout -b <temporary-branch> upstream/master

    Example

    git checkout -b temp-branch upstream/master

    Where <temporary-branch> is temp-branch.

  2. Push the temporary-branch to your origin using the following syntax:
    git push origin <temporary-branch>

    Example

    git push origin temp-branch

    Using the <temporary-branch> from the example in step 1.

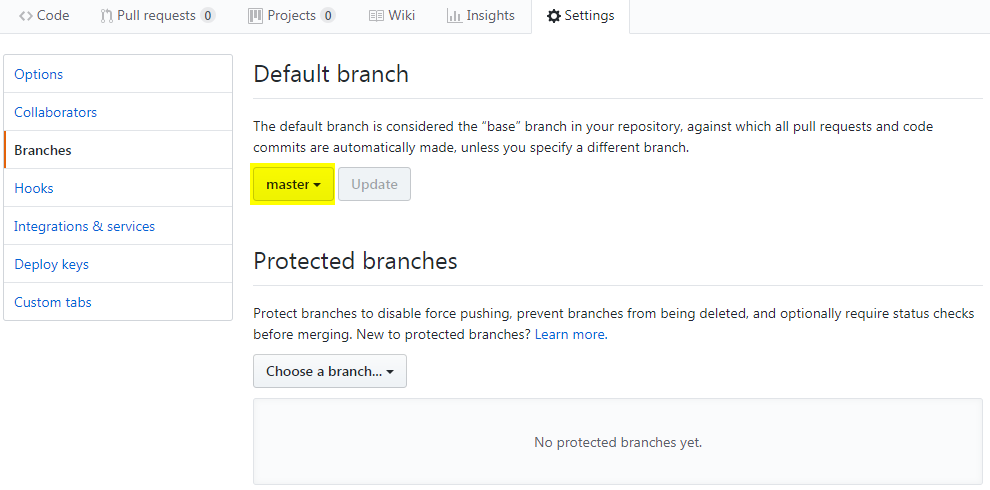
  3. On your browser, access your forked GitHub project and update the default branch to your temporary-branch.
  4. On your terminal (i.e. powershell, cmd, bash), switch to your master branch using the following command:
    git checkout master
  5. Reset the master based on the upstream's master branch using the following command:
    git reset --hard upstream/master
  6. Push the update to your master using the following command:
    git push origin master --force

    Note: If you didn't do step 3 this and the branch is proctected command will fail.

  7. On your browser, access your forked GitHub project and update the default branch to master.
  8. Going back to your terminal, delete the local temporary-branch using the following syntax:
    git branch -D <temporary-branch>

    Example

    git branch -D temp-branch

    Using the <temporary-branch> from the example in step 1.

  9. Delete the remote temporary-branch on your origin using the following syntax:
    git push origin --delete <temporary-branch>

    Example

    git push origin --delete temp-branch

    Using the <temporary-branch> from the example in step 1.

Chocolatey Package Manager

Introduction

If you are familiar with package manager of linux (e.g. rpm, apt-get, yum, dpkg, …) or mac (i.e. brew) here is the windows version.

Powershell Behind Proxy (if necessary)
Setting default Powershell TLS Protocol (if necessary)

Requirements

• Windows 7+ / Windows Server 2003+
• PowerShell v2+
• .NET Framework 4+ (the installation will attempt to install .NET 4.0 if you do not have it installed)

Installation using Powershell

Set-ExecutionPolicy Bypass -Scope Process -Force; iex ((New-Object System.Net.WebClient).DownloadString('https://chocolatey.org/install.ps1'))

Proxy configuration (if necessary)

choco config set proxy <locationandport>
choco config set proxyUser <username> #optional
choco config set proxyPassword <passwordThatGetsEncryptedInFile> # optional
choco config set proxyBypassList "'<bypasslist, comma separated>'" # optional, Chocolatey v0.10.4 required
choco config set proxyBypassOnLocal true # optional, Chocolatey v0.10.4 required

Example

choco config set proxy http://localhost:8888
choco config set proxyUser bob
choco config set proxyPassword 123Sup#rSecur3
choco config set proxyBypassList "'http://localhost,http://this.location/'" #0.10.4 required
choco config set proxyBypassOnLocal true #0.10.4 required

Usage

Displaying the tool capabilities

choco -?

Useful Commands

CommandDescription
installInstalls a particular package.
list --local-onlyLists installed packages using chocolatey on local machine.
searchSearches a package availability.
uninstallUninstalls a package.
upgradeUpgrades a package.

Alternative to CLI search command

https://chocolatey.org/packages

Reference

https://chocolatey.org/

Configure Tinker Board with Static IP

    1. Using terminal go to /etc/network/interfaces.d directory.
    2. Create a file (e.g. ipv4) with the following content for IPv4:
      auto eth0
       iface eth0 inet static
       address <desired IP address for eth0>
       netmask <valid netmask>
       gateway <gateway address>
       #The following dns-nameservers field is optional
       #dns-nameservers <dns addresses delimited by space>
      
      auto wlan0
       iface wlan0 inet static
       address <desired IP address for wlan0>
       netmask <valid netmask>
       gateway <gateway address>
       #The following dns-nameservers field is optional
       #dns-nameservers <dns addresses delimited by space>

      Example

      auto eth0
       iface eth0 inet static
       address 192.168.0.100
       netmask 255.255.255.0
       gateway 192.168.0.1
       dns-nameservers 8.8.8.8 8.8.4.4
      
      auto wlan0
       iface wlan0 inet static
       address 192.168.0.101
       netmask 255.255.255.0
       gateway 192.168.0.1
    3. Disable the DHCPCD service using the following command:
      sudo systemctl disable dhcpcd.service
    4. Attach a LAN cable to your tinker board and run the following command:
      sudo systemctl restart networking

      Check your IP using the following command:

      ip addr show

      You might also want to disable the network manager using the following command if you don't need a desktop UI:

      sudo systemctl disable NetworkManager


Transport Layer Security (TLS) Handshake

  1. The client sends "client hello" and a number of specifications in plain text, such as the version of the TLS protocol it is running, the list of supported ciphersuites, and other TLS options it may want to use.
  2. The server picks the TLS protocol version for further communication, responds with "server hello", decides on a ciphersuite from the list provided by the client, attaches its certificate and public key and sends the response back to the client. Optionally, the server can also send a request for the client’s certificate and parameters for other TLS extensions.
  3. Assuming both sides are able to negotiate a common version and cipher, and the client is happy with the certificate provided by the server.The client creates a random Pre-Master Secret and encrypts it with the public key from the server's certificate, sending the encrypted Pre-Master Secret to the server.
  4. The server receives the Pre-Master Secret. The server and client each generate the Master Secret and session keys based on the Pre-Master Secret.
  5. The client sends "Change cipher spec" notification to server to indicate that the client will start using the new session keys for hashing and encrypting messages. Client also sends "Client finished" message.
  6. Server receives "Change cipher spec" and switches its record layer security state to symmetric encryption using the session keys. Server sends "Server finished" message to the client.
  7. Client and server can now exchange application data over the secured channel they have established. All messages sent from client to server and from server to client are encrypted using session key.

Reference