Extremely Serious

Month: July 2017

Making your home Nginx on Raspberry Pi accessible from the Internet

Pre-requisites

  • Nginx installed on your Raspberry Pi or you can follow the procedure from here.
  • A router that can forward ports.

Procedure

  1. Access your router firmware and look for port forwarding configuration.
  2. Then configure your router port 80 to be forwarded to your local Raspberry Pi with Nginx with static IP also with port 80 (i.e. where Nginx is listening by default).

Port Forwarding Procedures

Telecom - Technicolor Gateway TG582n

Port Forwarding using Telecom Technicolor Gateway TG582n

  1. Sign in to your Telecom Technicolor Gateway TG582n as Admin.
  2. Click Toolbox and then the Game and Application Sharing menu.
  3. At the bottom of the page select the Create a new game or application menu.
  4. Type in a name (e.g. Test Application), select Manual Entry of Port Maps then click the Next button.
  5. If your interest is to forward port 80 from the router to an internal port 80 on the local network. Fill up the port range from 80 to 80 and to be translated to a local port 80 and  then click the Add button.
  6. After clicking the add button you will see two entries were added since we leave the value any in the protocol field.
  7. Click again the menu from step 2 and at the bottom of the page click the Assign a game or application to a local network device menu.
  8. Select the application (i.e. Test Application if you use the example from step 4) we've created earlier for the Game or Application field and select <User-defined...> for the Device field and type in the static IP of your local device (e.g. 192.168.1.10) to the additional field. Then click the Add button.
  9. After clicking the add button and no error you will see your application as a new entry in the list of the current page.

Installing Nginx in Ubuntu

Nginx is a lightweight HTTP server, reverse proxy and email proxy server.

Pre-requisite

  • Already running Ubuntu platform.

Procedure

  1. Sign-in to your machine with the non-root user but a sudoer.
  2. Install Nginx with the following command using the terminal:
    sudo apt-get install nginx
  3. When you are asked Do you want to continue [Y/n]? press Enter and wait for it complete.

Validation

On the terminal run the following command:

curl http://localhost

If the installation was successful you will see  something similar to the following output:

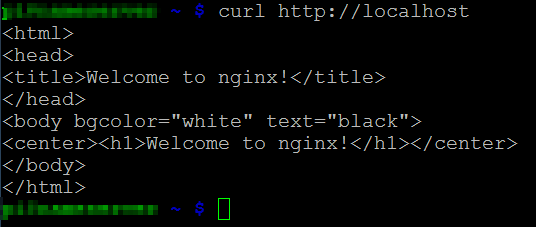
If the output is not similar to the output above, most probably that the Nginx was not started after the installation. To start it, use the following command and repeat the curl command:

sudo service nginx start

Using NoIP’s Dynamic DNS Update Client (DUC) with Raspberry Pi

Sometimes we wanted our personal service to be hosted in our own network at home and we wanted it to be accessible via internet. However, our ISP doesn't provided us with a static IP. Thus our public IP could be anything for some moment. Knowing this different IP's is not ideal and tedious. This is where a service like NoIP comes in where it gives a more easy to remember hostname that is attached to your current public IP. But keeping it updated is still a tedious thing to do.  This is where we can use Raspberry Pi to do this task for us.

Assumption

  • Windows is being used for configuration.

Pre-requisites

  • Existing NoIP account with registered hostname or sign up here and register a hostname.
  • Existing Raspberry Pi Server or setup a new one.
  • WinSCP is installed (or any SFTP client you know how to use). In the  procedure I am only using WinSCP for simplicity.
  • Putty is installed (or any SSH client you know how to use). In the procedure I am only using Putty for simplicity.

Procedure

  1. Download Dynamic DNS Update Client for Linux here (i.e. normally named noip-duc-linux.tar.gz).
  2. Using WinSCP upload the newly downloaded file to the home directory of the account with sudo group on your target Raspberry Pi. The output is similar to the following when using the default pi user:
  3. Using putty sign-in to your Raspberry Pi using the account you used in the previous step.
  4. In your home directory extract the tarball using the following command:
    tar -zxf noip-duc-linux.tar.gz

    The extract is a directory similar to the following format:

    noip-<version>
  5. Go into the extracted folder and install using the following commands:
    sudo make
    sudo make install
  6. Type in your login or email address (i.e. you used on noip sign up ) and press Enter.
  7. Type in your password (i.e. you used on noip sign up ) and press Enter.
  8. Type in your update interval and press Enter or just press Enter (i.e. if default [30] is good for you).
  9. Press Enter and the output is similar to the following if your noip version is 2.1.9-1:
  10. Go to /etc/init.d directory with the following commad:
    cd /etc/init.d
  11. Create a noip2 file with the following command:
    sudo vi noip2
  12. Type i (i.e. insert mode) and paste the following script:
    #! /bin/sh
    #. /etc/rc.d/init.d/functions   # uncomment/modify for your killproc
    case "$1" in
    start)
    echo "Starting noip2."
    sleep 10
    /usr/local/bin/noip2
    ;;
    stop)
    echo -n "Shutting down noip2."
    killproc -TERM /usr/local/bin/noip2
    ;;
    *)
    echo "Usage: $0 {start|stop}"
    exit 1
    esac
    exit 0
    
  13. Type :wq (i.e. write and quit) and then press enter.
  14. Make the script executable with the following command:
    sudo chmod 755 noip2
  15. Go to /etc/rc3.d directory with the following command:
    cd /etc/rc3.d
  16. Create a symbolic link named S05noip2 pointing to the noip2 script you've created earlier with the following command:
    sudo ln -s ../init.d/noip2 S05noip2

Validation

After completing the procedure above, do the following:

  1. Identify your current public IP here and note it.
  2. Ping the hostname you've registered to NoIP using the command terminal and check if it is equal to the IP you've noted from the previous step.