Extremely Serious

Category: Networking

Understanding the OSI Model: A Layered Approach to Networking

The Open Systems Interconnection (OSI) model is a conceptual framework that standardizes the functions of a telecommunication or computing system into seven abstraction layers. This layered approach facilitates a systematic understanding of network communication processes. In this article, we'll explore each layer of the OSI model and illustrate its functions with an example of sending an email.

1. Physical Layer (Layer 1):

The Physical Layer is the foundation of the OSI model, dealing with the physical connection between devices. This includes the hardware characteristics, such as cables, connectors, and transmission mediums. In our email example, this layer represents the actual transmission of electronic signals or light pulses over the physical medium, be it an Ethernet cable, Wi-Fi, or other communication channels.

2. Data Link Layer (Layer 2):

The Data Link Layer is responsible for creating a reliable link between two directly connected nodes. It handles framing, addressing, and error detection. In our example, this layer encapsulates the email packet into frames and adds a Media Access Control (MAC) address for communication between devices on the same network.

3. Network Layer (Layer 3):

The Network Layer manages logical addressing and routing of data packets between different networks. This layer is crucial for determining the best path for the email packet to reach its destination. In our scenario, the Network Layer ensures the email packet is routed across the Internet to the recipient's email server.

4. Transport Layer (Layer 4):

The Transport Layer ensures end-to-end communication and manages data flow control, error correction, and retransmission. In the email example, this layer uses a transport protocol (e.g., SMTP) to break the email into smaller packets and guarantees reliable delivery.

5. Session Layer (Layer 5):

The Session Layer is responsible for establishing, maintaining, and terminating communication sessions between applications. In our scenario, this layer manages the session between the email client and the email server, handling tasks like session setup and termination.

6. Presentation Layer (Layer 6):

The Presentation Layer deals with data representation, encryption, and compression. It translates data between the application layer and the lower layers, ensuring compatibility between different systems. In the email example, this layer formats the text and attachments in a way that both the sender and receiver can understand.

7. Application Layer (Layer 7):

The topmost layer, the Application Layer, interacts directly with end-user applications. It provides network services directly to end-users and application processes. In our example, you compose and send an email using your email client, which operates at the Application Layer.

In conclusion, the OSI model provides a structured framework for understanding the complexities of network communication. Each layer plays a specific role in ensuring the successful transmission of data. Whether you're sending an email, browsing the web, or engaging in any online activity, the OSI model underlies the seamless functioning of modern computer networks.

Ubuntu Stops Resolving Address

Issue

Pinging any known working internet address is returning the following message:

Temporary failure in name resolution

Example

Pinging www.google.com as follows:

ping: www.google.com: Temporary failure in name resolution

Resolution

Check where you /etc/resolve.conf is pointing using the following command:

 ls -al /etc | grep resolv.conf

If it is not pointing to /run/systemd/resolve/resolv.conf. Do the following:

sudo rm /etc/resolv.conf
sudo ln -s /run/systemd/resolve/resolv.conf  /etc/resolv.conf
sudo systemctl restart systemd-resolved.service

IPv6 Unicast Address Types

Global Unicast Address

This address has a global scope with the same purpose as IPv4 public address.

Link Local Address

This address has a local scope and cannot be used outside the link (i.e. network segment or broadcast address) and non routable. Normally has the following prefix:

FE80::/10

Loopback Address

This address corresponds to the software loopback interface of the network card and doesn't necessarily requires hardware associated with it. Normally has the following address:

::1/128

Unspecified Address

This address indicates an absence of address. This is represented by the following:

::/128

Unique Local Address

This is analogous to IPv4 private networking and has the following range:

FC00::/7
FD00::/8

Monitoring Artifactory Service with Nagios

Requirement

  • check_jmx plugin

Enable JMX on Artifactory

  1. Update the /var/opt/jfrog/artifactory/etc/default file to add the following:
    export JAVA_OPTIONS="$JAVA_OPTIONS -Dcom.sun.management.jmxremote -Dcom.sun.management.jmxremote.port=5000 -Dcom.sun.management.jmxremote.local.only=false -Dcom.sun.management.jmxremote.authenticate=false -Dcom.sun.management.jmxremote.ssl=false"

    If you wanted to connect remotely (e.g. jconsole) add the following argument:

    -Djava.rmi.server.hostname=<IP_ADDRESS>
  2. Restart the artifactory service:
    sudo systemctl restart artifactory.service

Testing with check_jmx plugin

/usr/local/nagios/libexec/check_jmx/nagios/plugin/check_jmx -U service:jmx:rmi:///jndi/rmi://localhost:5000/jmxrmi -O "org.jfrog.artifactory:instance=Artifactory, type=Storage,prop=Binary Storage" -A Size

Expect to see something similar to the following output:

JMX OK Size=377653571

Related Post
Downloading the Nagios check_jmx Plugin in Ubuntu

Configuring NRPE 4 Daemon and Plugin to Ubuntu 20.04

Installing NRPE

    1. Refresh the repository:
      sudo apt-get update
    2. Install the dependencies:
      sudo apt-get install autoconf automake gcc libc6 libmcrypt-dev make libssl-dev wget openssl -y
    3. Change the directory to your home directory:
      cd ~
    4. Download the nrpe 4 source codes:
      wget https://github.com/NagiosEnterprises/nrpe/releases/download/nrpe-4.0.3/nrpe-4.0.3.tar.gz
    5. Extract the downloaded source codes:
      tar xvf nrpe-4.0.3.tar.gz
    6. Change to the directory of the newly extracted source codes:
      cd nrpe-4.0.3
    7. Run the configure script that enables the command arguments for clients and uses ssl library:
      sudo ./configure --enable-command-args --with-ssl-lib=/usr/lib/x86_64-linux-gnu/
    8. Compile the source codes:
      sudo make all
    9. Install the nagios user and group:
      sudo make install-groups-users
    10. Install both NRPE daemon and check_nrpe plugin:
      sudo make install
    11. Install the nrpe config file (i.e. /usr/local/nagios/etc/nrpe.cfg):
      sudo make install-config
    12. Install the init script:
      sudo make install-init
    13. Enable the nrpe daemon:
      sudo systemctl enable nrpe.service
    14. Update allowed_hosts field in the /usr/local/nagios/etc/nrpe.cfg file: to include your nagios server address (e.g. your nagios server address is 10.0.0.174 the allowed hosts is as follows):
      allowed_hosts=127.0.0.1,::1,10.0.0.174
    15. Update the dont_blame_nrpe field: to 1 on the same configuration file to allow your clients to specify arguments:
      dont_blame_nrpe=1
    16. Start the nrpe daemon:
      sudo systemctl start nrpe.service

      The NRPE service is listening with the port 5666 by default.

Testing The NRPE Plugin

/usr/local/nagios/libexec/check_nrpe -H localhost

Expect to see the version of NRPE daemon

Related Post
Compiling NRPE 4 Plugin to Tinkerboard
Compiling Nagios Plugin 2.3.3 to Ubuntu 20.04

Compiling NRPE 4 Plugin to Tinkerboard

Installing NRPE

  1. Refresh the repository:
    sudo apt-get update
  2. Install the dependencies:
    sudo apt-get install libssl-dev -y
  3. Change the directory to your home directory:
    cd ~
  4. Download the nrpe 4 source codes:
    wget https://github.com/NagiosEnterprises/nrpe/releases/download/nrpe-4.0.3/nrpe-4.0.3.tar.gz
  5. Extract the downloaded source codes:
    tar xvf nrpe-4.0.3.tar.gz
  6. Change to the directory of the newly extracted source codes:
    cd nrpe-4.0.3
  7. Run the configure script:
    ./configure
  8. Compile the check_nrpe plugin only:
    sudo make check_nrpe
  9. Install the newly compiled plugin:
    sudo make install-plugin
  10. Update the file /usr/local/nagios/etc/objects/commands.cfg to add the following entry:
    define command {
    	command_name    check_nrpe
    	command_line    /usr/local/nagios/libexec/check_nrpe -H $HOSTADDRESS$ -t 30 -c $ARG1$ $ARG2$
    }

Testing The Plugin

Using the command check_nrpe we can check the load on the host 10.0.0.202 (i.e. NRPE daemon must be configured and listening on port 5666) using the following command:

/usr/local/nagios/libexec/check_nrpe -H 10.0.0.202 -c check_load

Expect to see the output of the check_load plugin executed on the host 10.0.0.202

Configuring Nagios 4 to Tinkerboard

Installing Nagios

  1. Update the system:
    sudo apt-get update && sudo apt-get upgrade
  2. Install the dependencies:
    sudo apt-get install autoconf gcc libc6 make wget unzip apache2 php libapache2-mod-php libgd-dev libsasl2-modules mailutils -y
  3. Change the directory to your home directory:
    cd ~
  4. Download the nagios 4 source codes:
    wget https://assets.nagios.com/downloads/nagioscore/releases/nagios-4.4.6.tar.gz
  5. Extract the downloaded source codes:
    tar xzf nagios-4.4.6.tar.gz
  6. Change to the directory of the newly extracted source codes:
    cd nagios-4.4.6
  7. Run the configure script with integration to apache2:
    ./configure --with-httpd-conf=/etc/apache2/sites-enabled
  8. Compile the source:
    sudo make all
  9. Install the nagios user and group:
    sudo make install-groups-users
  10. Make nagios user a member of the www-data group:
    sudo usermod -aG nagios www-data
  11. Install nagios.
    sudo make install
  12. Install the init script:
    sudo make install-init
  13. Initialize the init script:
    sudo make install-daemoninit
  14. Install and configures permissions on the directory for holding the external command:
    sudo make install-commandmode
  15. Install the sample config files on the /usr/local/nagios/etc directory:
    sudo make install-config
  16. Install the nagios config file to apache2:
    sudo make install-webconf
  17. Update the SUID of the ping command:
    sudo chmod 4755 /bin/ping

Installing the Nagios Plugins

  1. Run the following command:
    sudo apt install nagios-plugins
  2. Update the $USER1$ property in the /usr/local/nagios/etc/resource.cfg file to have /usr/lib/nagios/plugins like as follows:
    $USER1$=/usr/lib/nagios/plugins

Configuring Apache2 Web Server

  1. Enable the rewrite module:
    sudo a2enmod rewrite
  2. Enable the CGI module:
    sudo a2enmod cgi
  3. Create nagiosadmin as a nagios web user:
    sudo htpasswd -c /usr/local/nagios/etc/htpasswd.users nagiosadmin

    Assign a strong password

  4. Restart the apache2 service:
    sudo systemctl restart apache2

Related Post
Configuring NRPE 4 Daemon and Plugin to Ubuntu 20.04
Compiling NRPE 4 Plugin to Tinkerboard

Port Forwarding using Telecom Technicolor Gateway TG582n

  1. Sign in to your Telecom Technicolor Gateway TG582n as Admin.
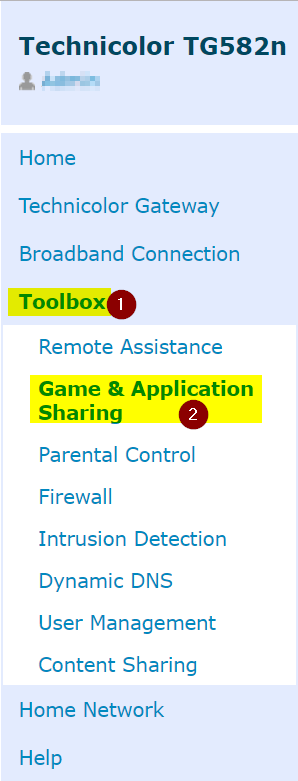
  2. Click Toolbox and then the Game and Application Sharing menu.
  3. At the bottom of the page select the Create a new game or application menu.
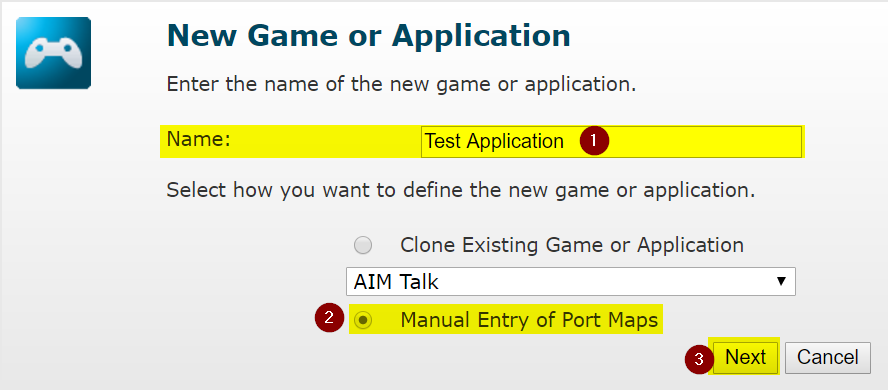
  4. Type in a name (e.g. Test Application), select Manual Entry of Port Maps then click the Next button.
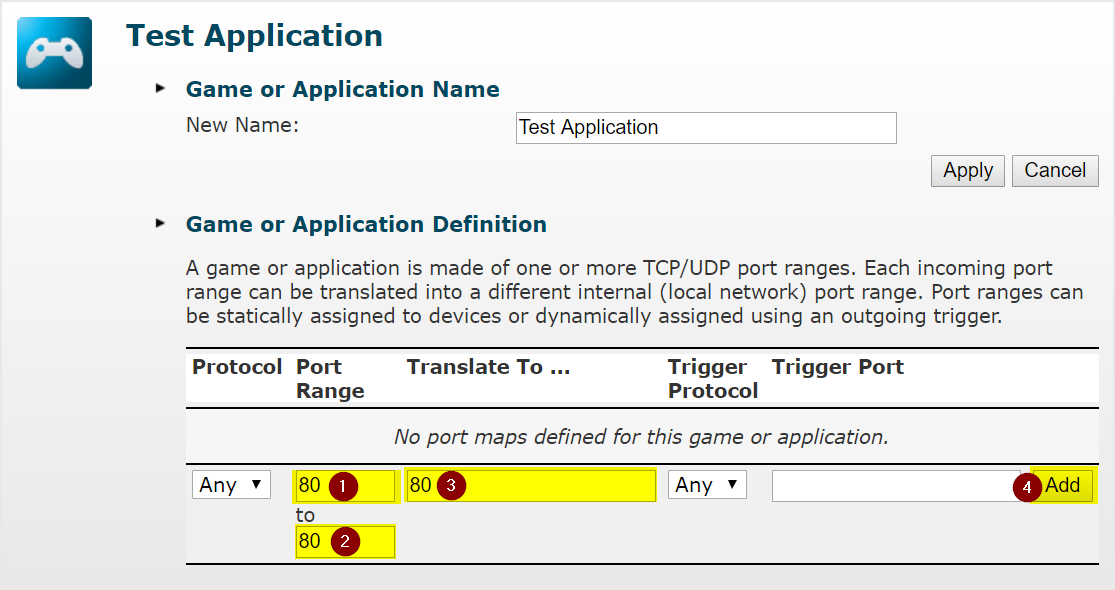
  5. If your interest is to forward port 80 from the router to an internal port 80 on the local network. Fill up the port range from 80 to 80 and to be translated to a local port 80 and  then click the Add button.
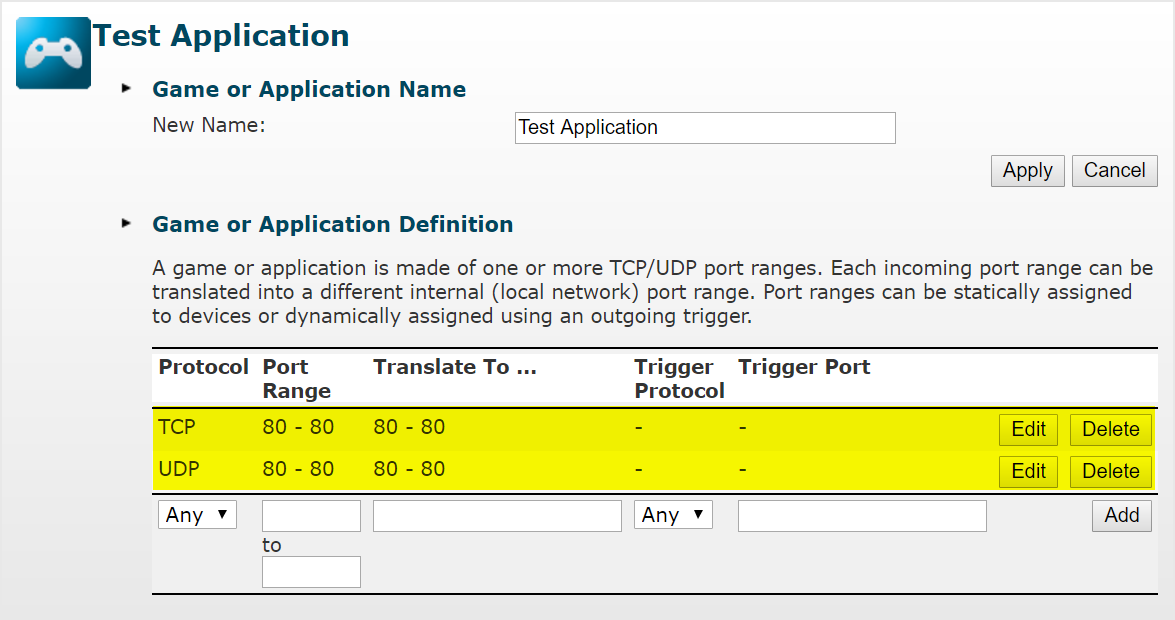
  6. After clicking the add button you will see two entries were added since we leave the value any in the protocol field.
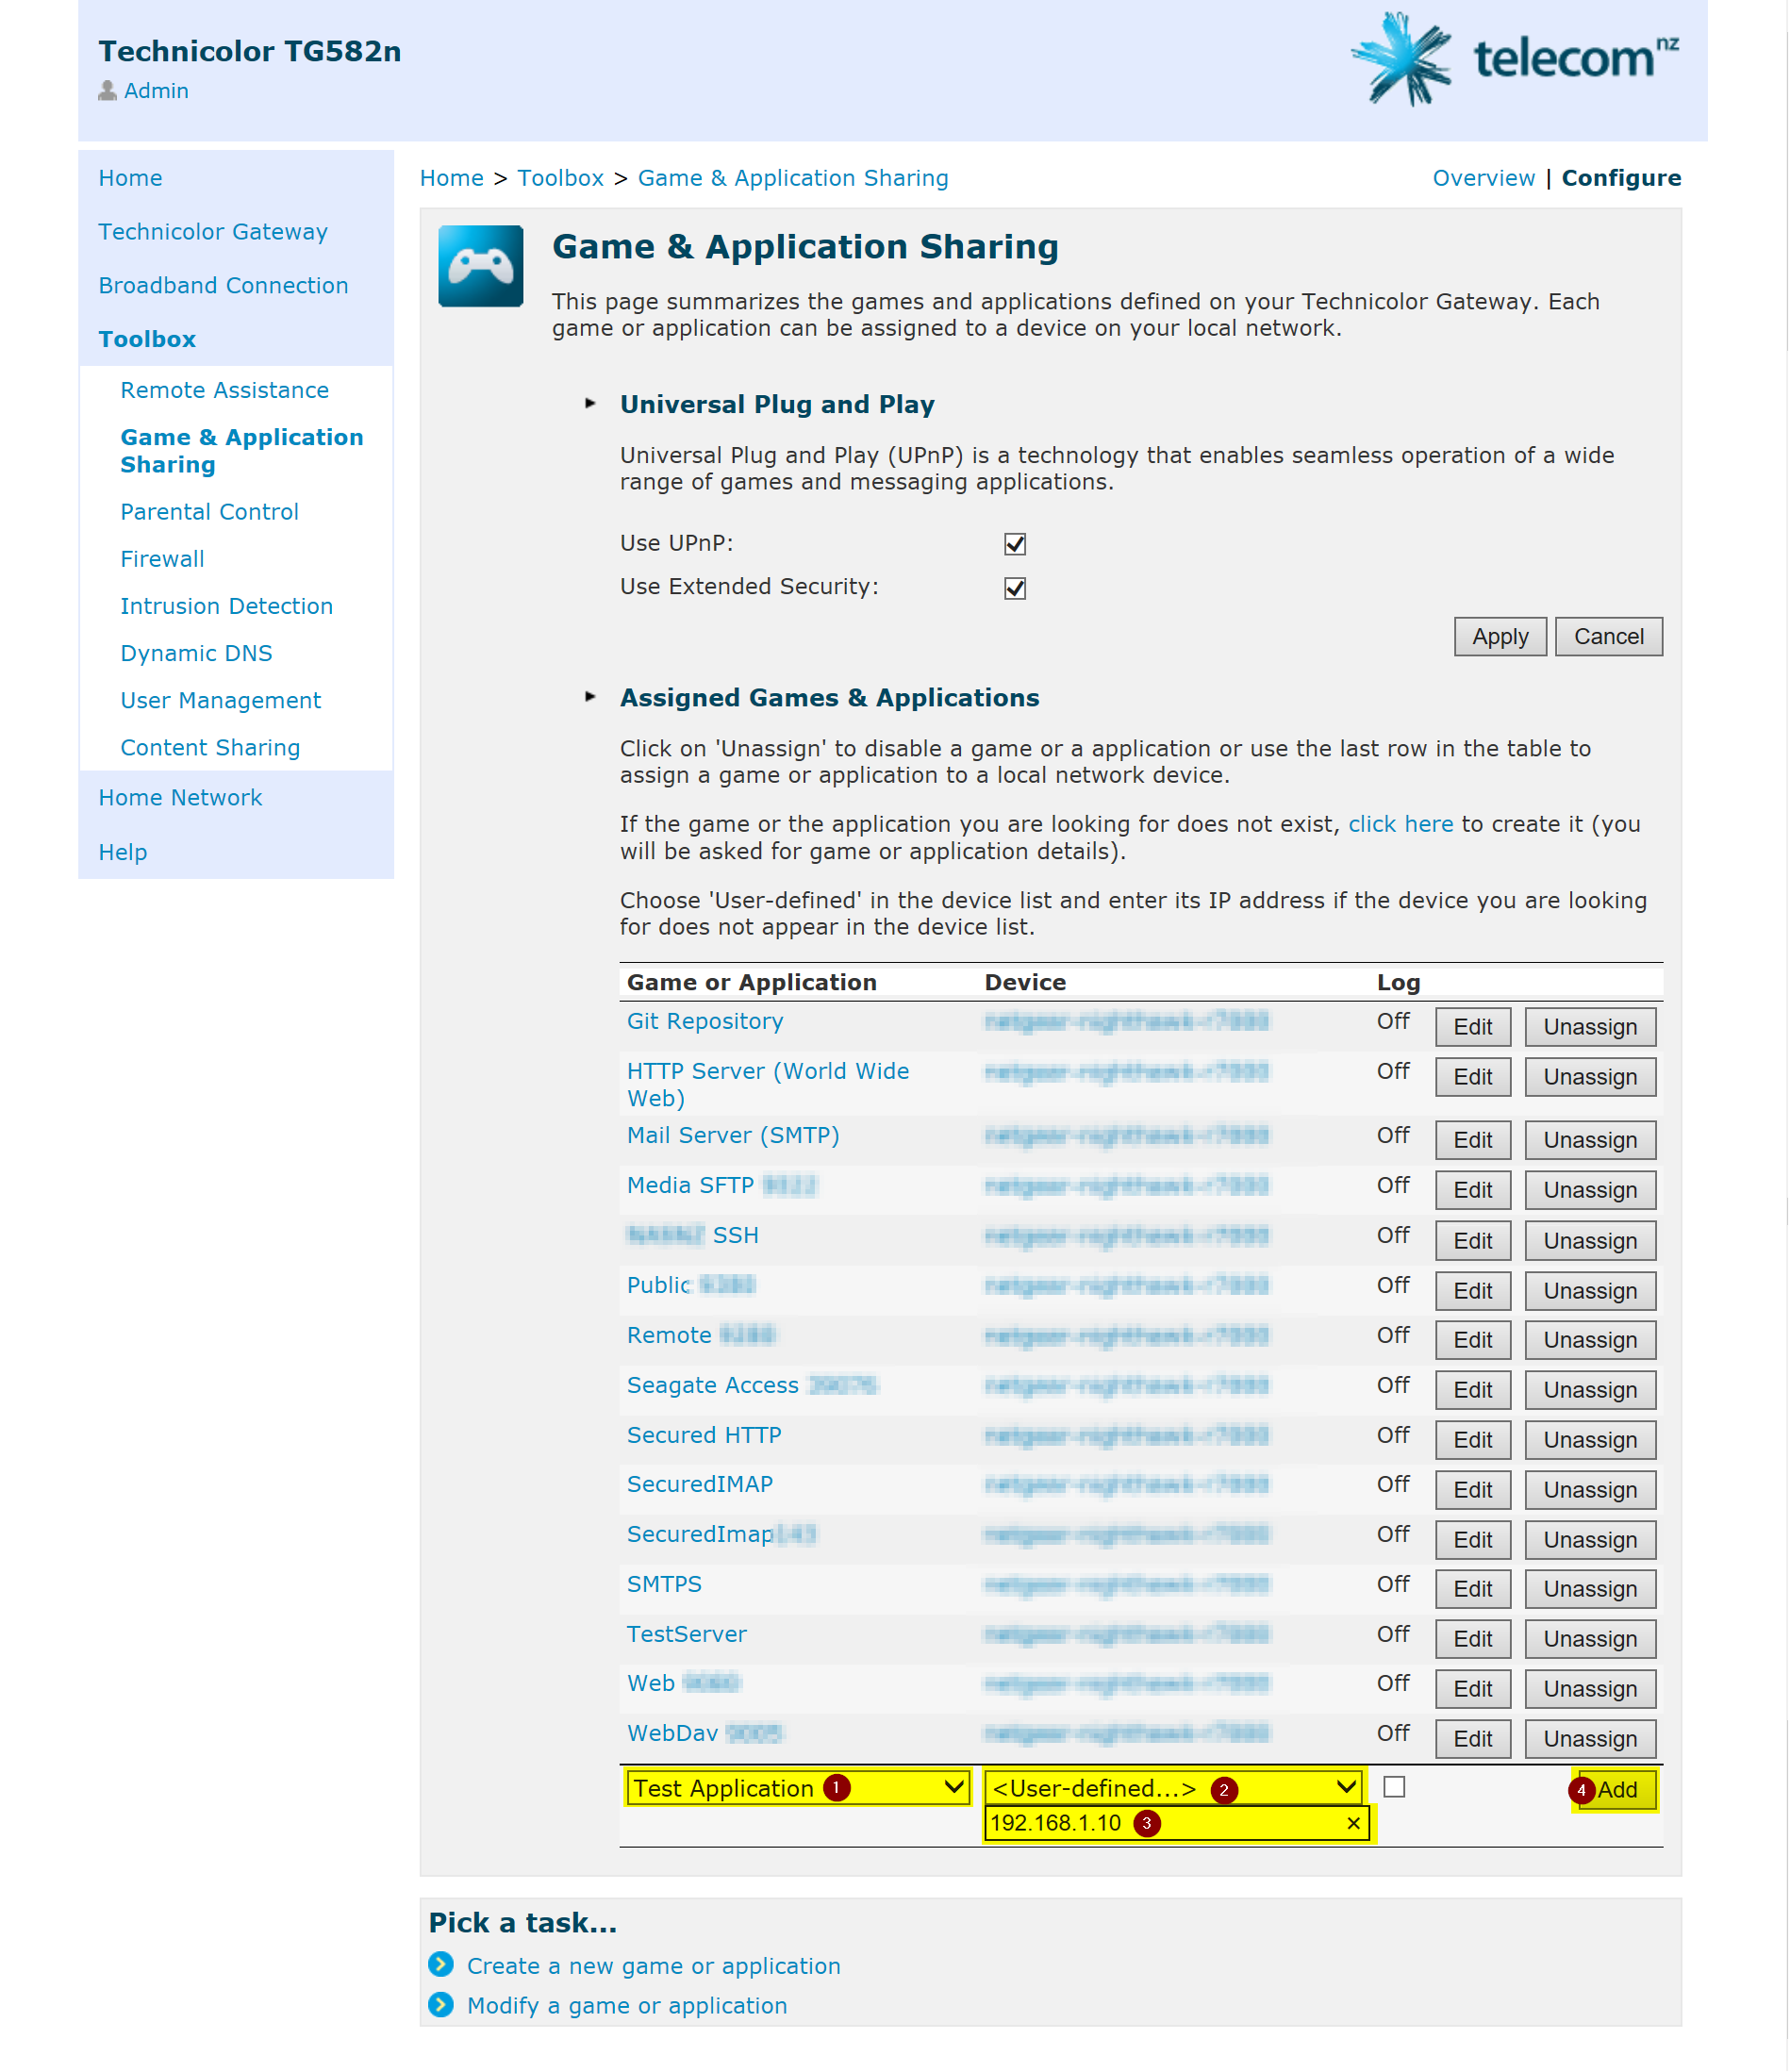
  7. Click again the menu from step 2 and at the bottom of the page click the Assign a game or application to a local network device menu.
  8. Select the application (i.e. Test Application if you use the example from step 4) we've created earlier for the Game or Application field and select <User-defined...> for the Device field and type in the static IP of your local device (e.g. 192.168.1.10) to the additional field. Then click the Add button.
  9. After clicking the add button and no error you will see your application as a new entry in the list of the current page.