- Create a folder compare session with beyond compare like the following:
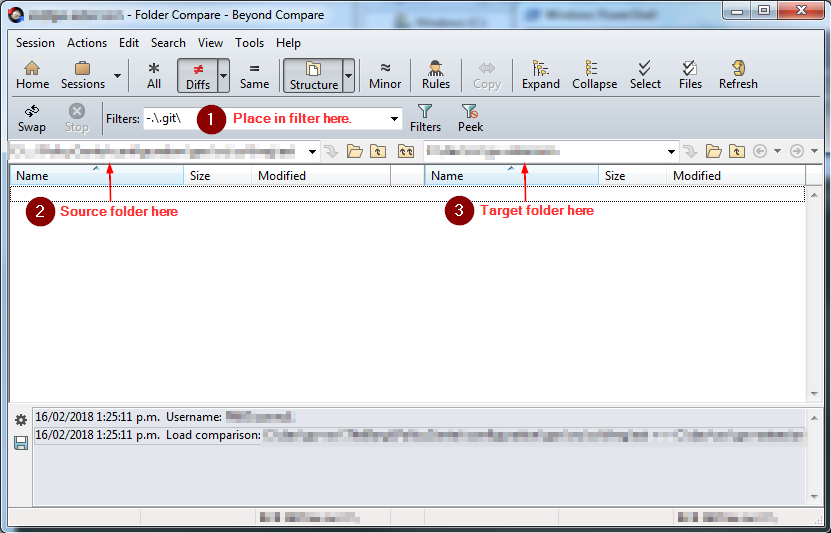
- Save the session with a file name without any special characters (e.g. < or >) or spaces (i.e. necessary not to confuse the scheduler).
- Save the following beyond compare script to right-updater.bc file.
#Write to right-updater.log
log normal "right-updater.log"

#Load a folder compare session.
load "%1"

#Confirmation will be set to yes by default.
option confirm:yes-to-all

#Make the right equals to the left of the loaded folder from the session.
sync mirror:left->right
- Save the following powershell script to bcrunner.ps1 file along the side right-updater.bc file.
#expects 2 command line parameters
param([string]$script, [string]$session)

#The beyond compare command to be used.
$cmd="C:\Program Files\Beyond Compare 4\BComp.com"

#Holds the session argument for the beyond compare command.
$args="""$session"""

#Write on screen the actual command to be executed.
write-output "$cmd /silent @$script $args"

#Perform the command.
&$cmd /silent @$script $args
- Schedule using windows task scheduler and on the actions tab fill in the following fields like:
Action Start a program Program/script powershell Add arguments(optional) ./bcrunner.ps1 right-updater.bc <SAVED_SESSION_FROM_STEP_2> Start in (optional) <DIRECTORY_OF_BCRUNNER.PS1_FILE_FROM_STEP_4> Note: Fill-in the other tabs of the scheduler accordingly.
Month: February 2018
Use Cases
Lower Jenkins (e.g. v1.x) but requires later Jenkins (e.g. v2.x) functionality (e.g. using git plugin which has some transitive dependencies which requires v2.x).
For some reason , we just wanted a Jenkins server to delegate a task to another Jenkins server.
You've created a script (i.e. python, ruby, groovy, etc) that will trigger a Jenkins task via HTTP protocol. This is not part of this document but the Backend Jenkins Server section is applicable.
Backend Jenkins Server
This is the server that will perform the task.
Setting-up a role that can do remote build
- Click Jenkins -> Manage Jenkins -> Manage and Assign Roles entry and select Manage Roles.
- In the Global roles, add a new role (e.g. remote_triggers) that is allowed to trigger a task remotely.
- Once added enable the following:
| Overall | Read |
| Job | Build |
| Job | Read |
| Job | Workspace |
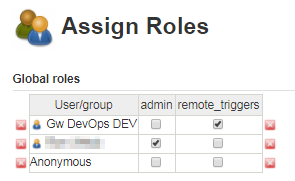
Example 1: Sample role configuration
If we have remote_triggers as the new role, we have the following:

Assigning a role to a user
- Click Jenkins -> Manage Jenkins -> Manage and Assign Roles entry and select Assign Role.
- In the Global roles, add a known Jenkins user.
- Once added assign the role.
Example 2: Assign a role following Example 1.
If the known user is GwDevOpsDev, we have the following:
Setting-up the Build Triggers
- On the Build Triggers section, select the Trigger builds remotely (e.g., from scripts).
- Provide an Authentication Token.
Note: You can use https://www.guidgenerator.com/ just remove the hyphen for this.
This will enable you to trigger the job remotely via HTTP Post using one of the following:
Without Build Parameters
<JENKINS_URL>/job/<URL_ENCODED_ITEM_NAME>/build?token=<AUTHENTICATION_TOKEN>
With Build Parameters
<JENKINS_URL>/job/<URL_ENCODED_ITEM_NAME>/buildWithParameters?token=<AUTHENTICATION_TOKEN>
Example 3: Address to call a task remotely.
If we have the following:
JENKINS_URL = http://d-51306g2.fmg.net:9080
ITEM_NAME=Statement Date Update to Saturday
URL_ENCODED_ITEM_NAME=Statement%20Date%20Update%20to%20Saturday
AUTHENTICATION_TOKEN=49dcf6a2164147b1871de70b40afef6f
The URL to call this job remotely with build parameters must be:
http://d-51306g2.fmg.net:9080/job/Statement%20Date%20Update%20to%20Saturday/buildWithParameters?token=49dcf6a2164147b1871de70b40afef6f
User Facing Jenkins Server
This is the Jenkins server that is normally use by the user to invoke tasks but the task is actually being done by a another Jenkins server.
Pre-requisite
- HTTP Request Plugin
Setting-up Credential to be used with the HTTP request.
- Click Jenkins -> Credentials entry.
- Click the global store seen as follows:
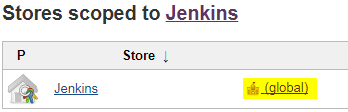
- Click Add Credentials.
- Set the Kind field to Username with Password.
- Set the Scope field to Global if not yet set.
- Set the Username field to the user that can to remote triggering configured on the backend Jenkins server (e.g. GwDevOpsDev from Example 2).
- Set the Password field to a valid password.
- Set the ID field to something unique.
Note: You can use https://www.guidgenerator.com/ for this. - Click the OK button.
Setting-up a New Item to Delegate Task to Backend Jenkins Server
- Click New Item.
- Provide an Item name.
- Select Freestyle project.
- Click the OK button.
- Click Add build step-> HTTP Request entry.
- Fill-in the URL with the one configured in the backend Jenkins server (e.g. http://d-51306g2.fmg.net:9080/job/Statement%20Date%20Update%20to%20Saturday/buildWithParameters?token=49dcf6a2164147b1871de70b40afef6f from Example 3)
- Select POST for the HTTP mode.
- Click the Advanced… button.
- In the Authenticate field select the set up from Setting-up Credential to be used with the HTTP request section earlier.
- Click the Save button.
- Now every time you click Build now it will complete immediately since the actual build will be done on the Backend Jenkins Server.
Introduction
Expando object can make dynamic object, properties and methods if you like. This can be used for stubbing an object to be used for testing.
For example if have the following:
Code 1 - processor function that requires the SSampleStructure structure
//Structure works with objects with similar features but no common inheritance and interface declarations
structure SSampleStructure {
  function someAction() : int
}

function processor(sample : SSampleStructure) : int {
  return sample.someAction() + 10
}
The SSampleStructure structure will be compliant to all the classes that has someAction function that returns an int. And the actual compliant implementation of the structure is the following:
Code 2 - Actual implementation that is compatible with SSampleStructure
class SampleCodeWithStaticMethods {

  private construct() {}

  function someAction() : int {
    return (Math.round(Math.random()*100) as int) + 100
  }
}
We can notice that in Code 2, we cannot have a consistent output for someAction method since it is return arbitrary values. And what the processor function does is just add 10 on it.
What we can do here is to create an Expando object that will also comply with SSampleStructure structure like the following:
Code 3 - Using Expando class
uses gw.lang.reflect.Expando

    // By declaring the Dynamic type for the variable or function argument, you can
// programmatically access any property or method without requiring compile-time confirmation of its existence.
var testObj : Dynamic =

// An expando object is an object whose properties, and potentially methods, are created dynamically on assignment.
    new Expando()

// We can attached function using the block syntax as below.
testObj.someAction = \ -> 25
Since the testObj of Code 3, also has someAction function that returns an int. This is compliant with SSampleStructure structure. So we can safely run the following test of logic without any problem:
Code 4 - Actual test
function testProcessor() {
  print("Is35: " + (processor(testObj)==35))
}

testProcessor()
As we can see from Code 4, we are using testObj to test the processor method.
Syntax
git clone -b <branch> <repo>
Example
git clone -b gw9 http://sample.gitrepo.org/r/gw/scm.git
Where:
branch = gw9
repo = http://sample.gitrepo.org/r/gw/scm.git
Edit <APP_DIR>\grails-app\conf\application.yml to add or edit the following lines:
---
server:
   port: <PORT_NUMBER>
Where:
<APP_DIR> is the directory created by using the grails create-app command.
<PORT_NUMBER> is the desired port to be used in the app.
- Execute the following to check the PROFILE variable:
Get-Variable | Where-Object {$_.Name -like "PROFILE"} - Test if its actually existing on the disk using the following command:
Test-Path $PROFILE
This will return True if the profile is already existing on the disk and ready for editing. If this returns False execute the following command:
New-Item -Path $PROFILE -ItemType "file" -Force
Jabba is a java version manager (see https://github.com/shyiko/jabba) that simplifies the installation and switching of/to different JDK.
If your powershell is behind the firewall follow the procedure here.
Install Jabba using the following cmdlet:
Note: If you encountered something like jabba.ps1 cannot be loaded because running scripts is disabled on this system. For
more information, see about_Execution_Policies at http://go.microsoft.com/fwlink/?LinkID=135170 see running unsigned script.
Invoke-Expression (
        wget https://github.com/shyiko/jabba/raw/master/install.ps1 -UseBasicParsing
    ).Content
- Get the current execution policy using the following command and remember it:
Get-ExecutionPolicy
- Set the execution policy to unrestricted using the following command:
Set-ExecutionPolicy -Scope CurrentUser -ExecutionPolicy Unrestricted
- Execute the unsigned script.
- Return the back execution policy to what it was (i.e. from step 1). Using the following command syntax similar to step 2:
Note: This is not required if you know that you are only running the script that you trust.
Set-ExecutionPolicy -Scope CurrentUser -ExecutionPolicy <EXECUTION_POLICY_FROM_STEP1>
Using the default network credentials
(New-Object System.Net.WebClient).Proxy.Credentials = [System.Net.CredentialCache]::DefaultNetworkCredentials
Using a different credentials
Using Get-Credential
(New-Object System.Net.WebClient).Proxy.Credentials = Get-Credential
Using NetworkCredential Object
(New-Object System.Net.WebClient).Proxy.Credentials = New-Object System.Net.NetworkCredential(<username>, <password>)
Note: You can add any one of these to your powershell profile to allow it to have network connectivity by default using proxy.
Introduction
Normally calling a SOAP WebAPI requires the developer to access WSDL then based on it generates the stubs linked to a particular server. After generating it, we need to compile those to make them ready to be used. The problem with that one is. Do we use the same server for development, testing and production? If yes, we need to regenerate the stubs for testing and if we are satisfied with the testing. We need to regenerate the stubs for production. Wait? The one tested is not really the one going to production. The simplest way to do is not to generate the stubs but understand how the soap message was structured. If we know the structure of the SOAP message (i.e. SOAP UI can be used here), then we can create it by hand. The following is the sample of assembling a SOAP message for invoking the evaluate method from the StudioService endpoint of PolicyCenter 7 (i.e. One of the Centers of Guidewire) using Java.
Code 1. Using JAXWS API with Java
import java.util.Iterator;

public class GWStudioService {

    public static void main(String[] args) throws SOAPException, IOException {
        String endpointUrl = "http://localhost:8180/pc/ws/gw/internal/webservice/studio/StudioService";
        String targetNamespace = "http://guidewire.com/pl/ws/gw/internal/webservice/studio/StudioService";

        QName serviceName = new QName(targetNamespace,"evaluateGosu");
        QName portName = new QName(targetNamespace,"StudioServiceSoap12Port");

        /** Create a service and add at least one port to it. **/
        Service service = Service.create(serviceName);
        service.addPort(portName, SOAPBinding.SOAP12HTTP_BINDING, endpointUrl);

        /** Create a Dispatch instance from a service.**/
        Dispatch dispatch = service.createDispatch(portName,
                SOAPMessage.class, Service.Mode.MESSAGE);

        /** Create SOAPMessage request. **/
        // compose a request message
        MessageFactory mf = MessageFactory.newInstance(SOAPConstants.SOAP_1_2_PROTOCOL);

        // Create a message.  This example works with the SOAPPART.
        SOAPMessage request = mf.createMessage();
        SOAPPart part = request.getSOAPPart();

        // Obtain the SOAPEnvelope and header and body elements.
        SOAPEnvelope env = part.getEnvelope();
        SOAPHeader header = env.getHeader();
        SOAPBody body = env.getBody();

        String authNS = "http://guidewire.com/ws/soapheaders";

        SOAPElement auth = header.addChildElement("authentication", "auth", authNS);
        SOAPElement username = auth.addChildElement("username", "auth");
        username.addTextNode("su");
        SOAPElement password = auth.addChildElement("password", "auth");
        password.addTextNode("gw");

        // Construct the message payload.
        SOAPElement operation = body.addChildElement("evaluateGosu", "stud",
                targetNamespace);
        SOAPElement value = operation.addChildElement("code", "stud");
        value.addTextNode("7072696e74282248656c6c6f20776f726c642229");
        request.saveChanges();

        System.out.println("Request\n");
        request.writeTo(System.out);

        SOAPMessage response = dispatch.invoke(request);

        System.out.println("\n\nResponse\n");
        response.writeTo(System.out);

        SOAPPart inSOAPPart = response.getSOAPPart();
        SOAPEnvelope inEnv = inSOAPPart.getEnvelope();
        SOAPBody inBody =  inEnv.getBody();

        Iterator inGosuResp = inBody.getChildElements(new QName(targetNamespace, "evaluateGosuResponse"));
        Iterator inReturn = inGosuResp.next().getChildElements(new QName(targetNamespace, "return"));
        Iterator inEntries= inReturn.next().getChildElements(new QName(targetNamespace, "Entry"));

        while (inEntries.hasNext()) {
            SOAPElement inEntry = inEntries.next();

            System.out.println(">");
            System.out.println(inEntry.getElementName().getLocalName());
            System.out.println(inEntry.getTextContent());
        }
    }
}
Output 1: Sample output of running code 1
<soap12:Envelope xmlns:soap12="http://www.w3.org/2003/05/soap-envelope"><soap12:Header/><soap12:Body><evaluateGosuResponse xmlns="http://guidewire.com/pl/ws/gw/internal/webservice/studio/StudioService">

<return>

<Entry>48656C6C6F20776F726C640D0A</Entry>

<Entry/>

</return>

</evaluateGosuResponse></soap12:Body></soap12:Envelope>
To understand the output of the entry we can use the following online Hex to String converter.
https://codebeautify.org/hex-string-converter
Reference:
https://axis.apache.org/axis2/java/core/docs/jaxws-guide.html#DispatchClient
Recent Comments