Extremely Serious

Category: Windows (Page 3 of 4)

PoSH-GVM (PowerSHell Groovy enVironment Manager)

Source:  https://github.com/flofreud/posh-gvm

Introduction

A tool for managing parallel Versions of multiple Software Development Kits on a windows based system.

Powershell Behind Proxy
Setting default Powershell TLS Protocol

Installation via Short Script

Invoke-WebRequest -Uri 'https://raw.githubusercontent.com/flofreud/posh-gvm/master/GetPoshGvm.ps1' | iex

Usage

Displaying the tool capability using the following:

gvm [help]

Useful Commands

Command Description
list Lists the available, installed and default versions of the candidate.
install Downloads and installs a particular candidate version (i.e. will default to latest if version is not specified)
use Uses a particular candidate version that is not the default.
default Sets a default version to use of a particular candidate.
current Displays the current active candidates version.
uninstall Uninstalls a particular candidate version.

Windows Command Output to Clipboard

Sometimes it is useful to get the output of a command and paste it to a text editor. For this we can use piping and the clip (i.e. sends the output to Windows clipboard) command.

Example:

If we go to any directory and run the tree command but it returns a very long output that exceeds the screen. We can redirect the output to Windows clipboard temporarily then paste it to a text editor.

  1. Open a command terminal.
  2. Try to run the following tree command.

%USERPROFILE%>tree

Where %USERPROFILE% is normally resolves to our local home directory.

The output might not fit to command terminal screen.

  1. Try redirecting it to a Windows clipboard with the following command:

%USERPROFILE%>tree | clip

You will see no output because it is directed to a Windows clipboard.

  1. Open a text editor of our choice (or anything where we wanted to paste the output).

Check if you can confirm the last entries from step 2 exists to our pasted output.

Always On Top using AutoHotKey

  1. Create an autohotkey script (e.g. alwaysontop.ahk).
  2. Add the following entries:
    #^+t::
    	WinSet, AlwaysOnTop, On, A
    Return
    
    #^t::
    	WinSet, AlwaysOnTop, Off, A
    Return

    Example script

    #NoEnv  ; Recommended for performance and compatibility with future AutoHotkey releases.
    ; #Warn  ; Enable warnings to assist with detecting common errors.
    SendMode Input  ; Recommended for new scripts due to its superior speed and reliability.
    SetWorkingDir %A_ScriptDir%  ; Ensures a consistent starting directory.
    
    #^+t::
    	WinSet, AlwaysOnTop, On, A
    Return
    
    #^t::
    	WinSet, AlwaysOnTop, Off, A
    Return

To make a window always on top press the following combination:

Win + Ctrl + Shift + t

To disable the effect of the always on top press the following combination:

Win + Ctrl + t

Git for Windows Credentials

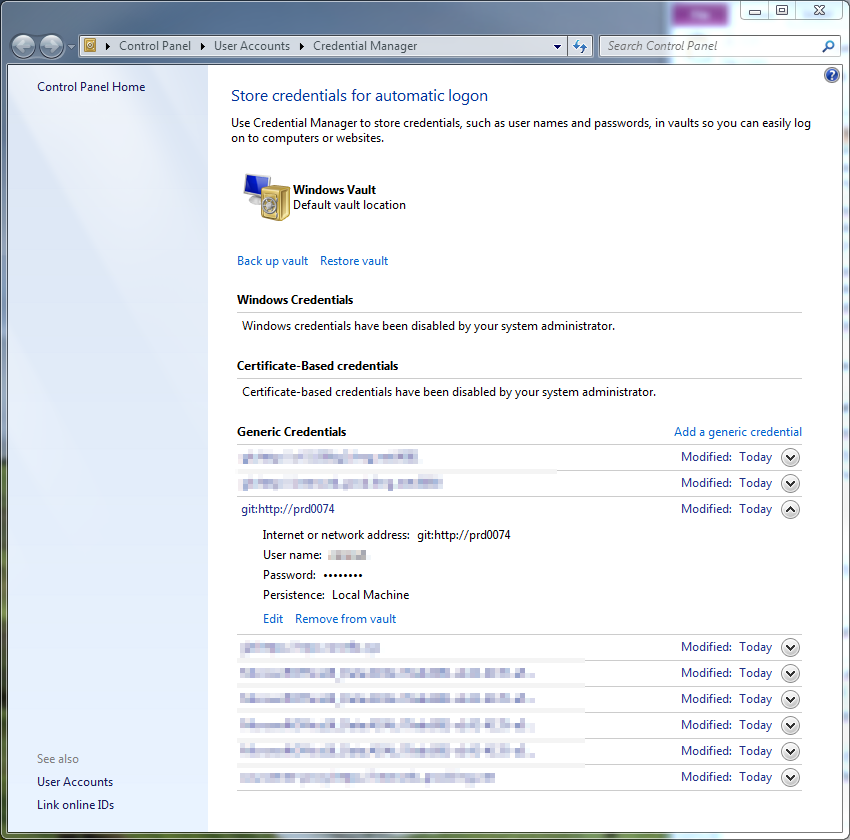
The location for git for windows credentials can be found in the Credential Manager of windows. You can use this manager to add, remove or delete a git credential.

This can be accessed from the Control Panel then click the User Accounts. From there, click Credential Manager.

Control Panel -> User Accounts -> Credential Manager

Normally the credential manager looks like the following:

Using Putty SSH Key Pair

  1. Login to your account on the remote server.
  2. Create a file ~/.ssh/authorized_keys file and placed in the putty public key with the following format:
ssh-rsa <PUBLIC_KEY> <KEY_COMMENT>

Note: If you don’t have a public key generated you can follow the procedure from Generating Putty SSH Key Pair.

If the file already exists then append the public key on a new line with the same format specified earlier.

  1. If necessary update the permission of the authorized_keys file with the following command:
chmod 600 ~/.ssh/authorized_keys
  1. If necessary update the permission of the .ssh directory with the following command:
chmod 700 ~/.ssh
  1. Setup the Pageant (see Using Pageant to hold the Putty Private Key) to hold the private key (and passphrase).
  2. Run the Putty application.
  3. Fill-up Host Name (or IP Address) field with the following format:
<USERNAME>@<HOST_NAME_OR_IP_ADDRESS>

Where fields are defined as follows:

<USERNAME> is the account name used on step 1.

<HOST_NAME_OR_IP_ADDRESS> is the remote server used on step 1.

Example

user@someserver.com

user@192.168.1.200

  1. Click the Open button and expect to be connected to the remote server without it asking you to provide your password (or even your passphrase).

Using Pageant to hold the Putty Private Key

  1. Run the Pageant daemon that will listen to a putty SSH connection.
  2. Right click the Pageant icon from the taskbar that can be identified like the following:
  3. Select Add Key.
  4. Browse and select the target private key (i.e. ppk file).
    Note: If you don’t have a private key generated you can follow the procedure from Generating Putty SSH Key Pair.
  5. Supply the passphrase of the key if required.

Passing the Private Key upon running the Pageant Daemon

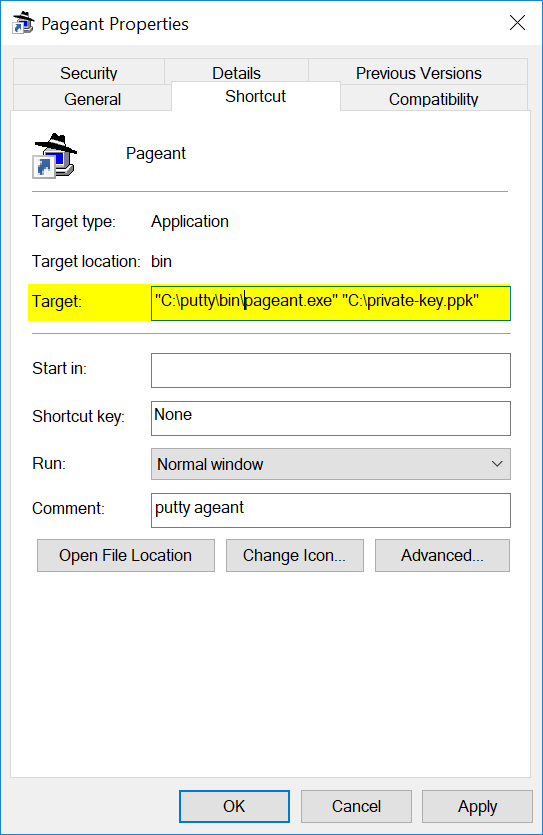
Every time at a pageant daemon was started the private key must be added. To simplify this, we can add the private key as a parameter on the target field of the shortcut of the pageant daemon like the following:

"<PAGEANT_EXECUTABLE>" "<PRIVATE_KEY>"

Example

Where the fields are defined as:

<PAGEANT_EXECUTABLE> is "C:\putty\bin\pageant.exe"<PRIVATE_KEY> is "C:\private-key.ppk"

Note: If the key has a passphrase it must be provided every time.

Generating Putty SSH Key Pair

  1. Run the Puttygen (i.e. Putty Key Generator).
  1. Click the Generate button.
  2. Move the mouse cursor on the blank area provided by the generator.
  3. Update the Key comment field if desired.
  4. Provide an identical passphrase to the following fields if desired:
    • Key passphrase
    • Confirm passphrase
  1. Click Save private key button.
  1. Click Save public key if desired.

The content of public key file is the one to be copied on the server with the following format:

ssh-rsa <CONTINUOUS_PUBLIC_KEY> <KEY_COMMENT>

And the file normally have the following format:

---- BEGIN SSH2 PUBLIC KEY ----
Comment: <KEY_COMMENT>
<DELIMITED_PUBLIC_KEY>
---- END SSH2 PUBLIC KEY ----

You are reading it right, in the file, the public key (i.e. DELIMITED_PUBLIC_KEY) is delimited by a carriage return. Thus, you need to remove it to have the CONTINUOUS_PUBLIC_KEY.

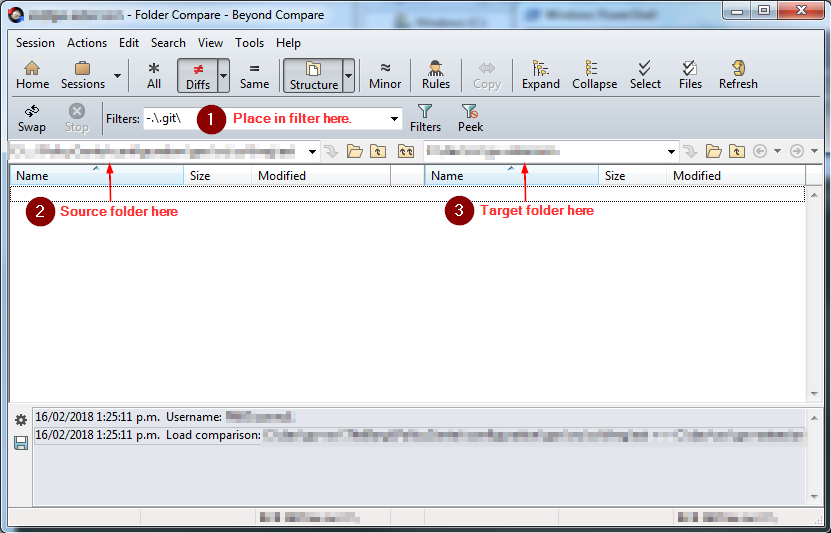
Make the Target Folder always in-sync from the Source Folder using Beyond Compare

  1. Create a folder compare session with beyond compare like the following:
  2. Save the session with a file name without any special characters (e.g. < or >) or spaces (i.e. necessary not to confuse the scheduler).
  3. Save the following beyond compare script to right-updater.bc file.
    #Write to right-updater.log
    log normal "right-updater.log"
    
    #Load a folder compare session.
    load "%1"
    
    #Confirmation will be set to yes by default. 
    option confirm:yes-to-all
    
    #Make the right equals to the left of the loaded folder from the session.
    sync mirror:left->right
  4. Save the following powershell script to bcrunner.ps1 file along the side right-updater.bc file.
    #expects 2 command line parameters
    param([string]$script, [string]$session)
    
    #The beyond compare command to be used.
    $cmd="C:\Program Files\Beyond Compare 4\BComp.com"
    
    #Holds the session argument for the beyond compare command.
    $args="""$session"""
    
    #Write on screen the actual command to be executed.
    write-output "$cmd /silent @$script $args"
    
    #Perform the command.
    &$cmd /silent @$script $args
  5. Schedule using windows task scheduler and on the actions tab fill in the following fields like:
    Action Start a program
    Program/script powershell
    Add arguments(optional) ./bcrunner.ps1 right-updater.bc <SAVED_SESSION_FROM_STEP_2>
    Start in (optional) <DIRECTORY_OF_BCRUNNER.PS1_FILE_FROM_STEP_4>

    Note: Fill-in the other tabs of the scheduler accordingly.

Registering Cygwin – NGINX as a Windows Service

The following procedure must be ran on an elevated cygwin terminal.

1. Run the following command and accept the defaults.

cygserver-config

2. Register the nginx as a service with the following command:

cygrunsrv --install nginx --path /usr/sbin/nginx.exe --disp "CYGWIN nginx" --termsig QUIT --shutdown --dep cygserver

« Older posts Newer posts »