- Open an open pull request on GitHub which normally has the following format:

- Open a terminal for running a git command (e.g. bash, cmd, powershell, etc...).
- Navigate to the location where your git forked repository was cloned.
- Download a copy of a pull request using the following command:
git fetch upstream pull/<ID>/head:<NEW BRANCH>
Where the variables can be describe as the following:
<ID> This is the associated code attached to the pull request. Normally has the following format #<ID> (e.g. #123) or see the format from step 1. <NEW BRANCH> This is the unique desired branch name on your fork. - Switch to the new branch and do what you want (e.g. code review, testing) using the following command:
git checkout <NEW BRANCH>
Author: ron (Page 30 of 33)
Ignoring files in git can be in the well known .gitignore file or in the .git/info/exclude file.
What's the difference between the two files?
|
File |
Description |
|
.gitignore |
Operates at the repository level and everyone is sharing this file. |
|
.git/info/exclude |
Operates at the local working directory (i.e. normally the root of the cloned repository) level and only you has this file. |
Exclude File
If .git/info/exclude file is present it must have the same formatting rule as the .gitignore file.
If the file to be ignored was already in the repository and you can still see it as modified. You can execute the following command:
git update-index --assume-unchanged <FILENAME>
Example:
git update-index --assume-unchanged config/database-config.xml
The reversal of this command is the following:
git update-index --no-assume-unchanged <FILENAME>
- Require the sudoer to prompt for a password by updating the /etc/sudoers file with the following:
Look for the following:%sudo ALL=(ALL) NOPASSWD: ALL
And update to become the following:
%sudo ALL=(ALL) ALL
- Update the /etc/ssh/sshd_config file to have the following added:
PermitRootLogin no
- Install fail2ban using the following command:
sudo apt-get install fail2ban
- Create the file /etc/fail2ban/jail.d/jail.ssh file to have the following:
[ssh]
 enabled = true
 port = ssh
 filter = sshd
 logpath = /var/log/auth.log
 maxretry = 6
 bantime = -1
 banaction = iptables-allports
- Restart the service using the following command:
sudo systemctl restart fail2ban
See Unbanning an IP
- Login to your account on the remote server.
- Create a file ~/.ssh/authorized_keys file and placed in the putty public key with the following format:
ssh-rsa <PUBLIC_KEY> <KEY_COMMENT>
Note: If you don’t have a public key generated you can follow the procedure from Generating Putty SSH Key Pair.
If the file already exists then append the public key on a new line with the same format specified earlier.
- If necessary update the permission of the authorized_keys file with the following command:
chmod 600 ~/.ssh/authorized_keys
- If necessary update the permission of the .ssh directory with the following command:
chmod 700 ~/.ssh
- Setup the Pageant (see Using Pageant to hold the Putty Private Key) to hold the private key (and passphrase).
- Run the Putty application.
- Fill-up Host Name (or IP Address) field with the following format:
<USERNAME>@<HOST_NAME_OR_IP_ADDRESS>
Where fields are defined as follows:
<USERNAME> is the account name used on step 1.
<HOST_NAME_OR_IP_ADDRESS> is the remote server used on step 1.
Example
user@someserver.com
user@192.168.1.200
- Click the Open button and expect to be connected to the remote server without it asking you to provide your password (or even your passphrase).
- Run the Pageant daemon that will listen to a putty SSH connection.
- Right click the Pageant icon from the taskbar that can be identified like the following:

- Select Add Key.
- Browse and select the target private key (i.e. ppk file).
Note: If you don’t have a private key generated you can follow the procedure from Generating Putty SSH Key Pair. - Supply the passphrase of the key if required.
Passing the Private Key upon running the Pageant Daemon
Every time at a pageant daemon was started the private key must be added. To simplify this, we can add the private key as a parameter on the target field of the shortcut of the pageant daemon like the following:
"<PAGEANT_EXECUTABLE>" "<PRIVATE_KEY>"
Example
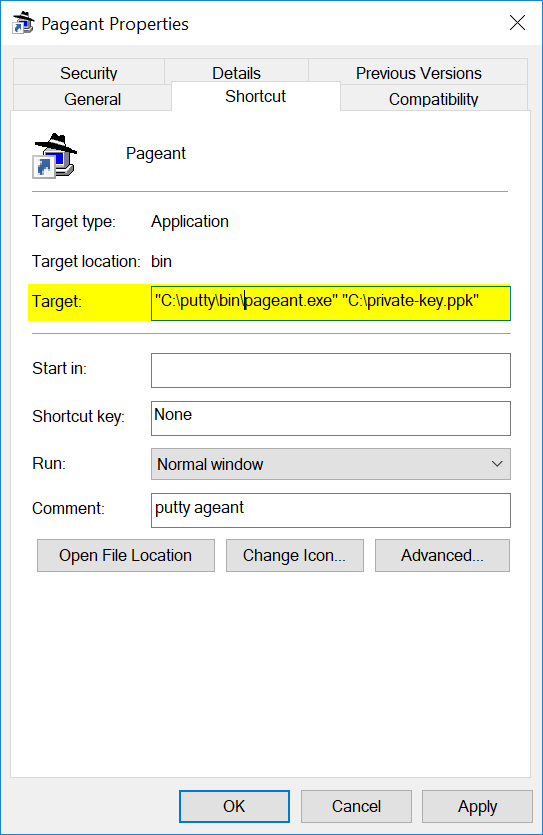
Where the fields are defined as:
<PAGEANT_EXECUTABLE> is "C:\putty\bin\pageant.exe"<PRIVATE_KEY> is "C:\private-key.ppk"
Note: If the key has a passphrase it must be provided every time.
- Run the Puttygen (i.e. Putty Key Generator).
- Click the Generate button.
- Move the mouse cursor on the blank area provided by the generator.
- Update the Key comment field if desired.
- Provide an identical passphrase to the following fields if desired:
- Key passphrase
-
- Confirm passphrase
- Click Save private key button.
- Click Save public key if desired.
The content of public key file is the one to be copied on the server with the following format:
ssh-rsa <CONTINUOUS_PUBLIC_KEY> <KEY_COMMENT>
And the file normally have the following format:
---- BEGIN SSH2 PUBLIC KEY ----
Comment: <KEY_COMMENT>
<DELIMITED_PUBLIC_KEY>
---- END SSH2 PUBLIC KEY ----
You are reading it right, in the file, the public key (i.e. DELIMITED_PUBLIC_KEY) is delimited by a carriage return. Thus, you need to remove it to have the CONTINUOUS_PUBLIC_KEY.
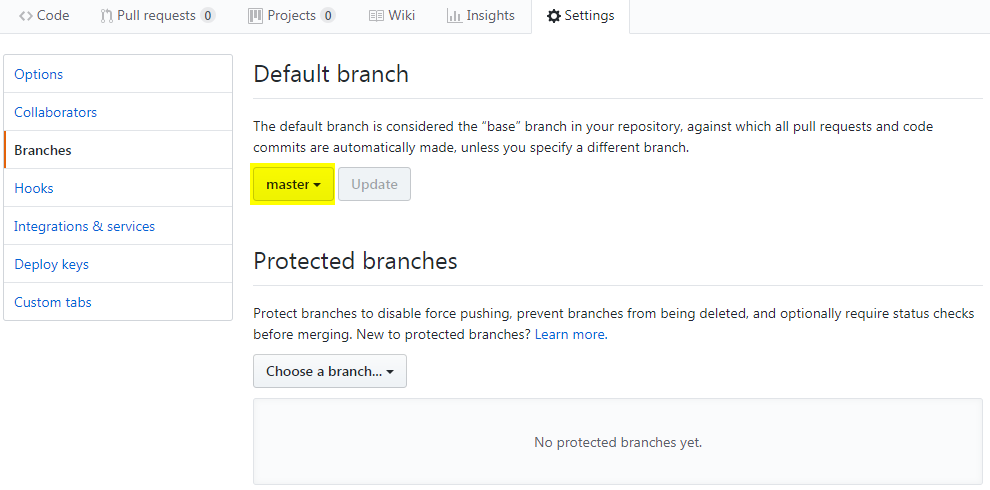
If your GitHub forked master branch is ahead from the upstream's master branch and you wanted to make it even (i.e. also lose some work). The following procedure might help you.
Note: If you have your default branch protected perform steps 1, 2, 3, 7, 8 and 9. Otherwise just do steps 4, 5 and 6.
- Open a terminal (i.e. powershell, cmd, bash) and checkout the master of the upstream to a temporary branch (i.e. this could be anything) using the following syntax:
git checkout -b <temporary-branch> upstream/master
Example
git checkout -b temp-branch upstream/master
Where <temporary-branch> is temp-branch.
- Push the temporary-branch to your origin using the following syntax:
git push origin <temporary-branch>
Example
git push origin temp-branch
Using the <temporary-branch> from the example in step 1.
- On your browser, access your forked GitHub project and update the default branch to your temporary-branch.

- On your terminal (i.e. powershell, cmd, bash), switch to your master branch using the following command:
git checkout master
- Reset the master based on the upstream's master branch using the following command:
git reset --hard upstream/master
- Push the update to your master using the following command:
git push origin master --force
Note: If you didn't do step 3 this and the branch is proctected command will fail.
- On your browser, access your forked GitHub project and update the default branch to master.
- Going back to your terminal, delete the local temporary-branch using the following syntax:
git branch -D <temporary-branch>
Example
git branch -D temp-branch
Using the <temporary-branch> from the example in step 1.
- Delete the remote temporary-branch on your origin using the following syntax:
git push origin --delete <temporary-branch>
Example
git push origin --delete temp-branch
Using the <temporary-branch> from the example in step 1.
Introduction
If you are familiar with package manager of linux (e.g. rpm, apt-get, yum, dpkg, …) or mac (i.e. brew) here is the windows version.
Powershell Behind Proxy (if necessary)
Setting default Powershell TLS Protocol (if necessary)
Requirements
• Windows 7+ / Windows Server 2003+
• PowerShell v2+
• .NET Framework 4+ (the installation will attempt to install .NET 4.0 if you do not have it installed)
Installation using Powershell
Set-ExecutionPolicy Bypass -Scope Process -Force; iex ((New-Object System.Net.WebClient).DownloadString('https://chocolatey.org/install.ps1'))
Proxy configuration (if necessary)
choco config set proxy <locationandport>
choco config set proxyUser <username> #optional
choco config set proxyPassword <passwordThatGetsEncryptedInFile> # optional
choco config set proxyBypassList "'<bypasslist, comma separated>'" # optional, Chocolatey v0.10.4 required
choco config set proxyBypassOnLocal true # optional, Chocolatey v0.10.4 required
Example
choco config set proxy http://localhost:8888
choco config set proxyUser bob
choco config set proxyPassword 123Sup#rSecur3
choco config set proxyBypassList "'http://localhost,http://this.location/'" #0.10.4 required
choco config set proxyBypassOnLocal true #0.10.4 required
Usage
Displaying the tool capabilities
choco -?
Useful Commands
| Command | Description |
|---|---|
| install | Installs a particular package. |
| list --local-only | Lists installed packages using chocolatey on local machine. |
| search | Searches a package availability. |
| uninstall | Uninstalls a package. |
| upgrade | Upgrades a package. |
Alternative to CLI search command
https://chocolatey.org/packages
Reference
-
- Using terminal go to /etc/network/interfaces.d directory.
- Create a file (e.g. ipv4) with the following content for IPv4:
auto eth0
 iface eth0 inet static
 address <desired IP address for eth0>
 netmask <valid netmask>
 gateway <gateway address>
 #The following dns-nameservers field is optional
 #dns-nameservers <dns addresses delimited by space>

auto wlan0
 iface wlan0 inet static
 address <desired IP address for wlan0>
 netmask <valid netmask>
 gateway <gateway address>
 #The following dns-nameservers field is optional
 #dns-nameservers <dns addresses delimited by space>
Example
auto eth0
 iface eth0 inet static
 address 192.168.0.100
 netmask 255.255.255.0
 gateway 192.168.0.1
 dns-nameservers 8.8.8.8 8.8.4.4

auto wlan0
 iface wlan0 inet static
 address 192.168.0.101
 netmask 255.255.255.0
 gateway 192.168.0.1
- Disable the DHCPCD service using the following command:
sudo systemctl disable dhcpcd.service
- Attach a LAN cable to your tinker board and run the following command:
sudo systemctl restart networking
Check your IP using the following command:
ip addr show
You might also want to disable the network manager using the following command if you don't need a desktop UI:
sudo systemctl disable NetworkManager
Recent Comments