- Open the file jenkins.xml from the location where Jenkins was installed (e.g. C:\Program Files (x86)\Jenkins).
- Search for httpPort and updated it with whatever you wanted it to be (e.g. 9080) as long as it doesn't introduce any conflicts.
Example update to 9080
<arguments>-Xrs -Xmx256m -Dhudson.lifecycle=hudson.lifecycle.WindowsServiceLifecycle -jar "%BASE%\jenkins.war" --httpPort=9080 --webroot="%BASE%\war"</arguments>
Page 37 of 41
Negative look behind with regex is another useful constraint that we can add to our expression. It only matches the right side, if and only if the look behind doesn't match. The look behind doesn’t consume any characters and has the following syntax:
(?<!<look behind>)<right side>
Example:
<?xml version="1.0"?>
<fruits>
 <a>apple</a>
 <b></b>
 <c>cashew</c>
 <d></d>
</fruits>
From the XML above find all the empty elements and add an attribute empty that is set to true but only matching the opening tag.
| Find | Replace | Comment |
| (?<!^<)<(?<tag>\w*[^>])>(?=<) | <$1 empty=”true”> | The negative <look behind> is the one highlighted in blue.
The <right side> is the one highlighted in green. |
Positive look behind with regex is another useful constraint that we can add to our expression. It only matches the right side, if and only if the look behind matches. The look behind doesn’t consume any characters and has the following syntax:
(?<=<look behind>)<right side>
Example:
<?xml version="1.0"?>
<fruits>
 <a>apple</a>
 <b></b>
 <c>cashew</c>
 <d></d>
</fruits>
From the XML above find all the empty elements and add an attribute empty that is set to true but only matching the opening tag.
| Find | Replace | Comment |
| (?<=\n\s)<(?<tag>\w*[^>])>(?=<) | <$1 empty=”true”> | The positive <look behind> is the one highlighted in blue.
The <right side> is the one highlighted in green. |
Negative look ahead with regex is another useful constraint that we can add to our expression. It only matches the left side, if and only if the look ahead doesn't match. The look ahead doesn't consume any characters and has the following syntax:
<left side>(?!<look ahead>)
Example:
<?xml version="1.0"?>
<fruits>
 <a>apple</a>
 <b></b>
 <c>cashew</c>
 <d></d>
</fruits>
From the XML above find all the empty elements and add an attribute empty that is set to true but only matching the opening tag.
| Find | Replace | Comment |
| <(?<tag>\w*[^>])>(?!(\n|\w)) | <$1 empty=”true”> | The <left side> is the one highlighted in blue.
The negative <look ahead> is the one highlighted in green. |
Positive look ahead with regex is another useful constraint that we can add to our expression. It only matches the left side, if and only if the look ahead matches. The look ahead doesn't consume any characters and has the following syntax:
<left side>(?=<look ahead>)
Example:
<?xml version="1.0"?>
<fruits>
 <a>apple</a>
 <b></b>
 <c>cashew</c>
 <d></d>
</fruits>
From the XML above find all the empty elements and add an attribute empty that is set to true but only matching the opening tag.
| Find | Replace | Comment |
| <(?<tag>\w*[^>])>(?=</\k<tag>>) | <$1 empty="true"> | The <left side> is the one highlighted in blue.
The positive <look ahead> is the one highlighted in green. |
- Create gradle.properties files in the following directory if not yet existing:
<USER_HOME>/.gradle
- Add the following entries for http proxy configuration in the gradle.properties file:
systemProp.http.proxyHost=<PROXY_HOST>
systemProp.http.proxyPort=<PROXY_PORT>
systemProp.http.proxyUser=<PROXY_USERNAME>
systemProp.http.proxyPassword=<PROXY_PASSWORD>
systemProp.http.nonProxyHosts=<NON_PROXY_HOSTS>
Note: <NON_PROXY_HOSTS> is delimited by pipe symbol (e.g. localhost|*.test.net)
Note: If https proxy configuration is needed use the same entries except that all http will must be replaced with https (e.g. systemProp.https.proxyHost).
Parentheses in regular expression (RegEx) can be used for grouping expression and can be named. To name it, after the opening parenthesis follows it with the following:
?<name>
Within the same expression you can backreference the group using the following:
\k<name>
On the replace field, based on the group position it will be numbered starting from 1 and increasing from the left of the expression and must be preceded with dollar sign (i.e. $). Use this number to access the captured match.
Note: if your group exceeds a single digit use ${<nn>} (e.g. ${10}) notation.
Example
<?xml version="1.0"?>
<fruits>
 <a>apple</a>
 <b></b>
 <c>cashew</c>
 <d></d>
</fruits>
From the XML above find all the empty elements and add an attribute empty that is set to true.
| Find | Replace | Comment |
| <(?<tag>\w*[^>])></\k<tag>> | <$1 empty="true"></$1> | The named group (i.e. blue text) is assigned to $1.
The \k<tag> (i.e. green text) is the backreference. |
Parentheses in regular expression (RegEx) can be used for grouping expression.
Within the same expression you can backreference the group using the following:
\<GROUP_POSITION>
<GROUP_POSITION> is the quantitative location of the group from left to right starting from 1.
On the replace field, it follows the <GROUP_POSITION> but instead of using backslash (i.e. \) use dollar sign (i.e. $) to precedes it.
Note: if your group exceeds a single digit use ${<nn>} (e.g. ${10}) notation.
Example
<?xml version="1.0"?>
<fruits>
 <a>apple</a>
 <b></b>
 <c>cashew</c>
 <d></d>
</fruits>
From the XML above find all the empty elements and add an attribute empty that is set to true.
| Find | Replace | Comment |
| <(\w*[^>])></\1> | <$1 empty="true"></$1> | The group (i.e. blue text) is assigned to $1.
The \1 (i.e. green text) is the backreference. |
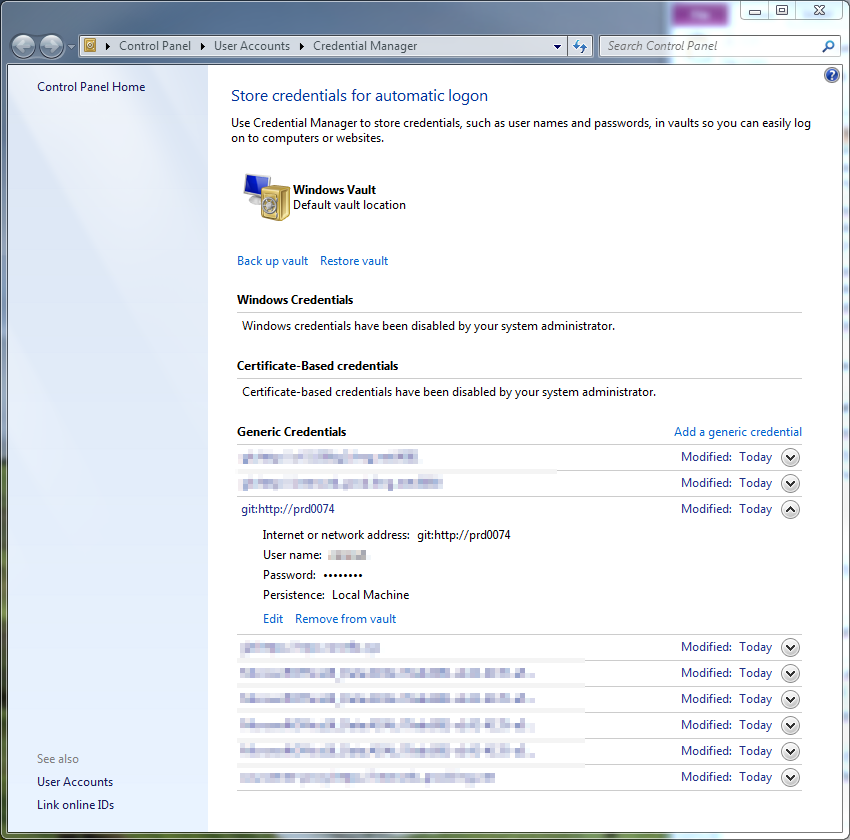
The location for git for windows credentials can be found in the Credential Manager of windows. You can use this manager to add, remove or delete a git credential.
This can be accessed from the Control Panel then click the User Accounts. From there, click Credential Manager.
Control Panel -> User Accounts -> Credential Manager
Normally the credential manager looks like the following:
- Open an open pull request on GitHub which normally has the following format:

- Open a terminal for running a git command (e.g. bash, cmd, powershell, etc...).
- Navigate to the location where your git forked repository was cloned.
- Download a copy of a pull request using the following command:
git fetch upstream pull/<ID>/head:<NEW BRANCH>
Where the variables can be describe as the following:
<ID> This is the associated code attached to the pull request. Normally has the following format #<ID> (e.g. #123) or see the format from step 1. <NEW BRANCH> This is the unique desired branch name on your fork. - Switch to the new branch and do what you want (e.g. code review, testing) using the following command:
git checkout <NEW BRANCH>
Recent Comments