- Install Tomcat 7 package in Diskstation
- Download archiva war file from the following address:
https://archiva.apache.org/index.cgi
- Place the downloaded war file (e.g. apache-archiva-2.2.3.war) into the following directory:
/volume1/@appstore/Tomcat7/src/webapps/
- In MariaDB, add the following user with appropriate password.
archivauser
and the following database
archiva
- Download the following jar files:
mail-1.4.jar
mariadb-java-client-1.5.x.jar
- Place the download jar files in the following directory:
/volume1/@appstore/Tomcat7/src/lib
- Create archiva.xml file in the following location:
/volume1/@appstore/Tomcat7/src/conf/Catalina/localhost
Add the following entries:
<?xml version="1.0" encoding="UTF-8"?>
<Context path="/archiva" docBase="/volume1/@appstore/Tomcat7/src/webapps/<ARCHIVA_WAR_FILENAME>">
<Resource name="jdbc/users" auth="Container" type="javax.sql.DataSource"
	username="archivauser"
	password="<PASSWORD_HERE>"
	driverClassName="org.mariadb.jdbc.Driver"
	url="jdbc:mariadb://<MARIADB_HOST_IP>:<MARIADB_HOST_PORT
	/archiva?autoReconnect=true" />
<Resource name="mail/Session" auth="Container" 	type="javax.mail.Session" mail.smtp.host="localhost"/>
</Context>
Note: The <ARCHIVA_WAR_FILENAME>, <PASSWORD_HERE> <MARIADB_HOST_IP> and <MARIADB_HOST_PORT tokens must be replaced by the downloaded war file from step 2, password used from step 4, IP address of MariaDB and port used by MariaDB repectively.
- Access archiva using the following address:
http://<DISKSTATION_HOST_IP>:7070/archiva
Note: Update the token <DISKSTATION_HOST_IP> with the IP of your Synology Diskstation.
Page 34 of 41
- Install Tomcat 7 package.
- Edit the following file:
/volume1/@appstore/Tomcat7/src/conf/tomcat-users.xml
- Add the following entries:
<role rolename="manager-gui"/>
<user username="admin" password="<PASSWORD_HERE>" roles="manager-gui"/>
Note: Update the token <PASSWORD_HERE> appropriately.
- Access the manager-gui using the following address format:
http://<DISKSTATION_HOST_IP>:7070/manager/html
Note: Update the token <DISKSTATION_HOST_IP> with the IP of your Synology Diskstation.
If you want to install any Linux distributions for WSL ensure that the Microsoft-Windows-Subsystem-Linux optional feature is enabled using the following procedure:
- Open a PowerShell as Administrator and run the following (i.e. if it is not installed):
Enable-WindowsOptionalFeature -Online -FeatureName Microsoft-Windows-Subsystem-Linux
- Restart the computer when prompted.
- Open the Microsoft Store
- Search for the Linux distribution (e.g. Ubuntu) you like.
- Click it and the click the Install button.
- After finishing the installation search for it in the Start menu.
Usually the newly installed application is at the top of the start menu.
For some reason, you have files with more than 1MB in total size to push to git respository by HTTP. You might be surprised that you cannot do it. This is because by default, git only posts to remote server via HTTP protocol with a maximum of 1MB. To remedy this, increase the http.postBuffer to 500MB (i.e. if you have to send files with 500MB total size) on client side like the following:
git config --global http.postBuffer 524288000
Reference
https://mirrors.edge.kernel.org/pub/software/scm/git/docs/git-config.html
Use the following for statement syntax with /f option
FOR /F ["options"] %variable IN (file-set) DO command [command-parameters]
FOR /F ["options"] %variable IN ("string") DO command [command-parameters]
FOR /F ["options"] %variable IN ('command') DO command [command-parameters]

    or, if usebackq option present:

FOR /F ["options"] %variable IN (file-set) DO command [command-parameters]
FOR /F ["options"] %variable IN ('string') DO command [command-parameters]
FOR /F ["options"] %variable IN (`command`) DO command [command-parameters]

    file-set is one or more file names.  Each file is opened, read
    and processed before going on to the next file in file-set.
    Processing consists of reading in the file, breaking it up into
    individual lines of text and then parsing each line into zero or
    more tokens.  The body of the for loop is then called with the
    variable value(s) set to the found token string(s).  By default, /F
    passes the first blank separated token from each line of each file.
    Blank lines are skipped.  You can override the default parsing
    behavior by specifying the optional "options" parameter.  This
    is a quoted string which contains one or more keywords to specify
    different parsing options.  The keywords are:

        eol=c           - specifies an end of line comment character
                          (just one)
        skip=n          - specifies the number of lines to skip at the
                          beginning of the file.
        delims=xxx      - specifies a delimiter set.  This replaces the
                          default delimiter set of space and tab.
        tokens=x,y,m-n  - specifies which tokens from each line are to
                          be passed to the for body for each iteration.
                          This will cause additional variable names to
                          be allocated.  The m-n form is a range,
                          specifying the mth through the nth tokens.  If
                          the last character in the tokens= string is an
                          asterisk, then an additional variable is
                          allocated and receives the remaining text on
                          the line after the last token parsed.
        usebackq        - specifies that the new semantics are in force,
                          where a back quoted string is executed as a
                          command and a single quoted string is a
                          literal string command and allows the use of
                          double quotes to quote file names in
                          file-set.
For a very basic example, lets capture the result of the echo test to a variable. This can be done as follows:
for /f %I in ('echo test') do set OUTPUT="%~I"
Note: The echo test command here could be any executable command (e.g. executing a different batch or any executable file).
Read a Batch Argument without the Quotes
This can be done by inserting a tilde (i.e. ~) character between the percent character and the corresponding argument position.
For example for argument position 1 we can access it as the following:
%~1
Read a Batch Variable without the Quotes
This can be done with the following syntax:
%<VARIABLE_NAME>:"=%
Note: This is just using the replacement syntax as follows:
%<VARIABLE_NAME>:<FIND>=<REPLACE>%
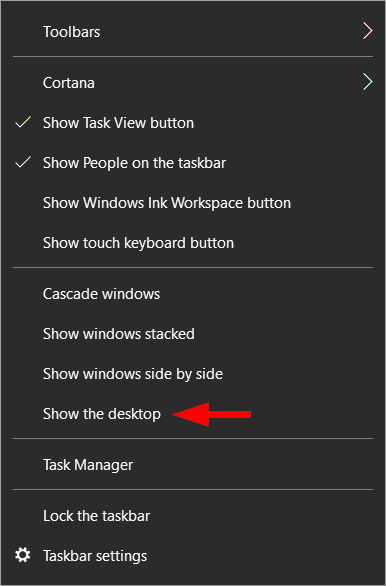
- Right-click on the taskbar and click Show the desktop as seen in the following:
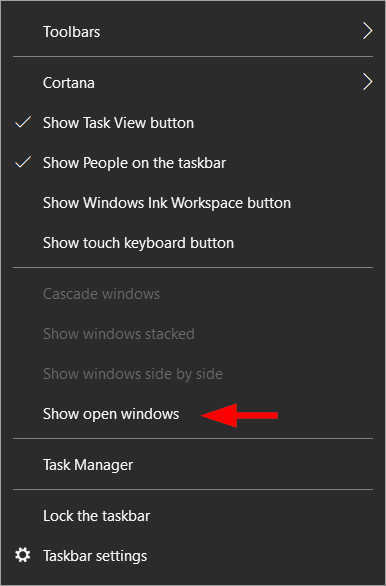
- Right-click on the taskbar and click Show open windows as seen in the following:
# Root logger option
log4j.rootLogger=INFO, file, stdout

# Console output
log4j.appender.stdout=org.apache.log4j.ConsoleAppender
log4j.appender.stdout.Target=System.out
log4j.appender.stdout.layout=org.apache.log4j.PatternLayout
log4j.appender.stdout.layout.ConversionPattern=%m%n

# File output
log4j.appender.file=org.apache.log4j.RollingFileAppender
log4j.appender.file.File=./logs/logging.log
log4j.appender.file.MaxFileSize=10MB
log4j.appender.file.MaxBackupIndex=10
log4j.appender.file.layout=org.apache.log4j.PatternLayout
log4j.appender.file.layout.ConversionPattern=%d{yyyy-MM-dd HH:mm:ss} %-5p %c{1}:%t - %m%n
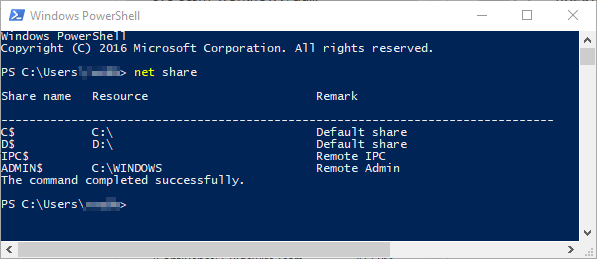
- Open a terminal (i.e. command prompt or powershell).
- Type in following command and hit enter:
net share
Expect to see something similar to the following:
Recent Comments