Extremely Serious

Category: Security (Page 4 of 4)

Securing Ubuntu SSH

  1. Update the /etc/ssh/sshd_config file to have the following added:
    PermitRootLogin no
  2. Install fail2ban using the following command:
    sudo apt-get install fail2ban
  3. Create the file /etc/fail2ban/jail.d/jail-debian.local file to have the following:
    [sshd]
     enabled = true
     port = ssh
     filter = sshd
     logpath = /var/log/auth.log
     maxretry = 6
     bantime = -1
    
  4. Restart the service using the following command:
    sudo service fail2ban restart

See Unbanning an IP

Hashing a Password in Java

  1. Create an instance of SecretKeyFactory using the desired algorithm (see. https://docs.oracle.com/javase/8/docs/api/index.html?javax/crypto/SecretKeyFactory.html) like the following:
    SecretKeyFactory skf = SecretKeyFactory.getInstance("PBKDF2WithHmacSHA512");

    Note: The PBKDF2WithHmacSHA512 is the algorithm to construct the secret key using the Password-Based Key Derivation Function.

  2. Synthesize the raw materials into the instance of PBEKeySpec using the following syntax:
    PBEKeySpec spec = new PBEKeySpec( <PASSWORD>, <SALT>, <ITERATIONS>, <KEY_LENGTH> );
    Parameter Description
    <PASSWORD> The raw password (i.e. in array of chars)
    <SALT> A text (i.e. in array of bytes) that will be included to password.
    <ITERATIONS> The desired number of iterations that the <PASSWORD> along with the <SALT> will be encoded. The higher the number the better to deter some kind of attack (e.g. rainbow).
    <KEY_LENGTH> The length (i.e. in bits) of the key. Normally you can find this value on the algorithm name (e.g. PBKDF2WithHmacSHA512).
  3. Create a SecretKey instance using the spec from step 2 using the following:
    SecretKey key = skf.generateSecret(spec);
  4. Retrieve the encoded hash using the getEncoded() method of the SecketKey instance like the following:
    byte[] encodedKey = key.getEncoded();
  5. Use Base64 encoder to  covert the encoded key to string like the following:
    String base64Str = Base64.getEncoder().encodeToString(encodedKey);

Example code

package xyz.ronella.crypto;

import javax.crypto.SecretKey;
import javax.crypto.SecretKeyFactory;
import javax.crypto.spec.PBEKeySpec;
import java.security.NoSuchAlgorithmException;
import java.security.spec.InvalidKeySpecException;
import java.util.Base64;

public class PasswordHashing {
    public static void main(String[] args) {
        try {
            SecretKeyFactory skf = SecretKeyFactory.getInstance("PBKDF2WithHmacSHA512");

            PBEKeySpec spec = new PBEKeySpec("PASSWORD".toCharArray(), "SALT".getBytes(), 10000, 512);
            SecretKey key = skf.generateSecret(spec);

            byte[] encodedKey = key.getEncoded();
            String base64Str = Base64.getEncoder().encodeToString(encodedKey);

            System.out.println(base64Str);

        } catch (NoSuchAlgorithmException e) {
            e.printStackTrace();
        } catch (InvalidKeySpecException e) {
            e.printStackTrace();
        }
    }
}

Securing Tinker Board SSH

  1. Require the sudoer to prompt for a password by updating the /etc/sudoers file with the following:
    Look for the following:

    %sudo ALL=(ALL) NOPASSWD: ALL

    And update to become the following:

    %sudo ALL=(ALL) ALL
  2. Update the /etc/ssh/sshd_config file to have the following added:
    PermitRootLogin no
  3. Install fail2ban using the following command:
    sudo apt-get install fail2ban
  4. Create the file /etc/fail2ban/jail.d/jail.ssh file to have the following:
    [ssh]
     enabled = true
     port = ssh
     filter = sshd
     logpath = /var/log/auth.log
     maxretry = 6
     bantime = -1
     banaction = iptables-allports
  5. Restart the service using the following command:
    sudo systemctl restart fail2ban

See Unbanning an IP

Transport Layer Security (TLS) Handshake

  1. The client sends "client hello" and a number of specifications in plain text, such as the version of the TLS protocol it is running, the list of supported ciphersuites, and other TLS options it may want to use.
  2. The server picks the TLS protocol version for further communication, responds with "server hello", decides on a ciphersuite from the list provided by the client, attaches its certificate and public key and sends the response back to the client. Optionally, the server can also send a request for the client’s certificate and parameters for other TLS extensions.
  3. Assuming both sides are able to negotiate a common version and cipher, and the client is happy with the certificate provided by the server.The client creates a random Pre-Master Secret and encrypts it with the public key from the server's certificate, sending the encrypted Pre-Master Secret to the server.
  4. The server receives the Pre-Master Secret. The server and client each generate the Master Secret and session keys based on the Pre-Master Secret.
  5. The client sends "Change cipher spec" notification to server to indicate that the client will start using the new session keys for hashing and encrypting messages. Client also sends "Client finished" message.
  6. Server receives "Change cipher spec" and switches its record layer security state to symmetric encryption using the session keys. Server sends "Server finished" message to the client.
  7. Client and server can now exchange application data over the secured channel they have established. All messages sent from client to server and from server to client are encrypted using session key.

Reference

HTTP Strict Transport Security (HSTS)

Have you experience something that when you access a website it will always try to use the HTTPS scheme. This can happen because of the following reason:

The server requests a redirect to an https scheme.

Or

The browser receives an Strict-Transport-Security (STS) header .

In our case, I am talking about the second one. With the advent of Let's Encrypt CA, everybody now can have a free SSL certificate if we like that normally lasts for 3-months. To make it longer than that, just use or create a script that will do the automatic renewal of our certificate.

The server can tell the browser to always use HTTPS for a period of time using HSTS.

HTTP Strict Transport Security (HSTS) is a web security policy mechanism which helps to protect websites against protocol downgrade attacks and cookie hijacking. - https://en.wikipedia.org/wiki/HTTP_Strict_Transport_Security

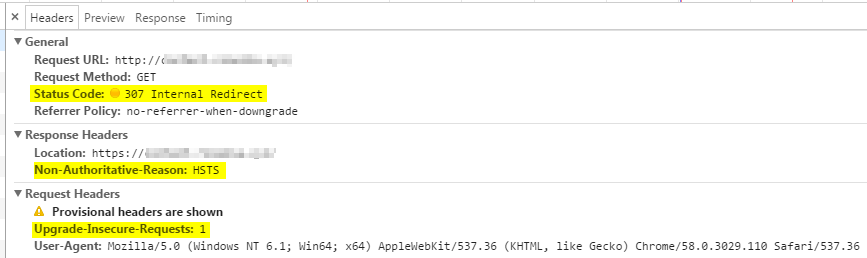
We can observe HSTS in action using chrome via the developer tools. If you access a website via HTTP and we can notice from the picture at the bottom that there's an internal redirect going-on (i.e. 307 Internal Redirect). This is not a redirect request coming from the server but from the browser itself.  Another clue is the existence of Non-Authoritative-Reason : HSTS header.

The Upgrade-Insecure-Request header is telling the server that we prefer the secured content to be served. Thus if our websites contains a mixture of HTTP and HTTPS artifacts (e.g. CSS, Javascript), everything will be served as HTTPS.

Related Post
CLEARING DOMAIN HSTS IN CHROME

SSL Secured WordPress on Seagate Personal Cloud

    1. Administrator Login on your Seagate Personal Cloud.
    2. Install WordPress application.
    3. Access the newly installed WordPress application.
    4. Setup the user information of the first user (i.e. admin by default) of WordPress.
    5. Update the the General Settings with the following:
      FieldValue
      WordPress Address (URL)https://<valid-url>/apps/wordpress
      Site Address (URL)https://<valid-url>/apps/wordpress
    6. Add the SSL Insecure Content Fixer plugin.
    7. Setup the SSL Insecure Content Fixer to have the following:
      FieldValue
      Fix insecure contentCapture All
      HTTPS detectionunable to detect HTTPS
Newer posts »