Extremely Serious

Category: Ubuntu (Page 2 of 2)

Blocking/Unblocking IP in Ubuntu

Pre-requisite

Install the iptables-persistent package to automatically load saved iptables rules.

sudo apt-get install iptables-persistent

Lists the rules in a chain or all chains

sudo iptables -L [CHAIN]

Where CHAIN sample value could be one of the following: INPUT, FORWARD or OUTPUT. If this is not provided all the chains will be listed.

Blocking an IP Address

sudo iptables -A INPUT -s <IP_ADDR> -j DROP
sudo sh -c "iptables-save > /etc/iptables/rules.v4"

Where IP_ADDR is the IP address to be blocked.

Unblocking an IP Address

sudo iptables -D INPUT -s <IP_ADDR> -j DROP
sudo sh -c "iptables-save > /etc/iptables/rules.v4"

Where IP_ADDR is the IP address to be unblocked if you use the preceding blocking procedure.

MailScanner with Postfix

Prerequisite

Resolving MailScanner Dependencies

  1. Run the following cpan commands one at a time (i.e. to see if they are successfully installed):
    sudo cpan -i Filesys::Df
    sudo cpan -i IO::Stringy
    sudo cpan -i DBI
    sudo cpan -i Net::CID
    sudo cpan -i Sys::SigAction
    sudo cpan -i MIME::Parser
    sudo cpan -i Archive::Zip
    sudo cpan -i OLE::Storage_Lite
    sudo cpan -i DBD::SQLite
  2. Install the following packages:
    sudo apt-get install unrar
    sudo apt-get install sqlite

Installing Clamav Antivirus

Run the following command:

sudo apt-get install clamav clamav-daemon

Integrating Clamav to MailScanner

  1. Update the /etc/MailScanner/MailScanner.conf to have the fields Virus Scanner and Clamd Socket to become as follows:
    Virus Scanner = clamd
    Clamd Socket = /var/run/clamav/clamd.ctl
  2. Restart the mailscanner service with the following command:
    sudo service mailscanner restart
  3. Update the file /etc/apparmor.d/usr.sbin.clamd to have the following entries:
      /var/spool/MailScanner/** rw,
      /var/spool/MailScanner/incoming/** rw,
  4. Restart the apparmor service with the following command:
    sudo systemctl restart apparmor.service

Installing and Updating Spamassassin

Run the following commands:

sudo apt-get install spamassassin
sudo sa-update
sudo service spamassassin start

Integrating MailScanner to Postfix

  1. Open the file /etc/postfix/main.cf for editing and add the following line and save:
    header_checks = regexp:/etc/postfix/header_checks
  2. Create the file /etc/postfix/header_checks with the following:
    /^Received:/ HOLD
  3. Open the file /etc/MailScanner/MailScanner.conf for editing and update with the following if necessary:
    Run As User = postfix
    Run As Group = postfix
    Incoming Queue Dir = /var/spool/postfix/hold
    Outgoing Queue Dir = /var/spool/postfix/incoming
    MTA = postfix
  4. Open the file /etc/MailScanner/defaults for editing and update with the following if necessary:
    run_mailscanner=1
  5. Update the group of /var/spool/MailScanner to mtagroup and allow the it write permission as follows:
    sudo chown :mtagroup /var/spool/MailScanner
    sudo chmod 775 MailScanner
  6. Prepare spamassassin's directory using the following commands:
    sudo mkdir /var/spool/MailScanner/spamassassin
    sudo chown postfix /var/spool/MailScanner/spamassassin
  7. Update the permission of the MailScanner's incoming and quarantine folders with the following commands:
    sudo chown postfix.mtagroup /var/spool/MailScanner/incoming
    sudo chmod 770 /var/spool/MailScanner/incoming
    sudo chown postfix.mtagroup /var/spool/MailScanner/quarantine
  8. Restart the mailscanner service with the following command:
    sudo service mailscanner restart

Related Post
Configuring Email Server with Postfix and Dovecot:

Configuring Email Server with Postfix and Dovecot

Prerequisite

  • privkey.pem file
  • fullchain.pem file

Installing Postfix

Run the following commands:

sudo apt-get update
sudo apt-get install postfix

Configuring Postfix

  1. Run the following command:
    sudo dpkg-reconfigure postfix

    Configuration questions:

    1. Select OK to proceed.
    2. Choose Internet Site.
    3. System Mail Name: <EMAIL_DOMAIN>
    4. Other destinations for mail: <EMAIL_DOMAIN>, localhost.<EMAIL_DOMAIN>, localhost
    5. Force synchronous updates on mail queue?: No
    6. Local networks: 127.0.0.0/8 [::ffff:127.0.0.0]/104 [::1]/128
    7. Use procmail for local delivery?: No
    8. Mailbox size limit (bytes): 0
    9. Local address extension character: +
    10. Internet protocols to use: all

    Feel free to answer the preceding questions based on your setup. Just replace the EMAIL_DOMAIN (i.e. example.com) with a valid value.

  2. Create the following folder:
    /etc/postfix/ssl
  3. Copy the your privkey.pem and fullchain.pem to /etc/postfix/ssl.
  4. Do additional configurations by executing the following commands:
    sudo postconf -e 'smtpd_sasl_local_domain ='
    sudo postconf -e 'smtpd_sasl_auth_enable = yes'
    sudo postconf -e 'smtpd_sasl_security_options = noanonymous'
    sudo postconf -e 'broken_sasl_auth_clients = yes'
    sudo postconf -e 'smtpd_recipient_restrictions =  permit_sasl_authenticated,permit_mynetworks,reject_unauth_destination'
    sudo postconf -e 'inet_interfaces = all'
    sudo postconf -e 'smtp_tls_security_level = may'
    sudo postconf -e 'smtpd_tls_security_level = may'
    sudo postconf -e 'smtpd_tls_auth_only = no'
    sudo postconf -e 'smtp_tls_note_starttls_offer = yes'
    sudo postconf -e 'smtpd_tls_loglevel = 1'
    sudo postconf -e 'smtpd_tls_received_header = yes'
    sudo postconf -e 'smtpd_tls_session_cache_timeout = 3600s'
    sudo postconf -e 'tls_random_source = dev:/dev/urandom'	
    sudo postconf -e 'mua_client_restrictions = permit_sasl_authenticated,reject'
    sudo postconf -e 'mua_helo_restrictions = permit_mynetworks, permit_sasl_authenticated'
    sudo postconf -e 'mua_sender_restrictions = permit_sasl_authenticated'
    sudo postconf -e 'smtpd_tls_key_file = /etc/postfix/ssl/privkey.pem'
    sudo postconf -e 'smtpd_tls_cert_file = /etc/postfix/ssl/fullchain.pem'
    sudo postconf -e 'myhostname = ronella.xyz'
  5. Create or update the /etc/postfix/sasl/smtpd.conf with the following:
    pwcheck_method: saslauthd
    mech_list: plain login
  6. In the /etc/postfix/master.cf file, uncomment the submission section and must be like the following entries:
    submission inet n       -       y       -       -       smtpd
      -o syslog_name=postfix/submission
      -o smtpd_tls_security_level=encrypt
      -o smtpd_sasl_auth_enable=yes
      -o smtpd_reject_unlisted_recipient=no
      -o smtpd_client_restrictions=$mua_client_restrictions
      -o smtpd_helo_restrictions=$mua_helo_restrictions
      -o smtpd_sender_restrictions=$mua_sender_restrictions
      -o smtpd_recipient_restrictions=
      -o smtpd_relay_restrictions=permit_sasl_authenticated,reject
      -o milter_macro_daemon_name=ORIGINATING
  7. Also in the same file, uncomment the smtps section and must be like the following entries:
    smtps     inet  n       -       y       -       -       smtpd
      -o syslog_name=postfix/smtps
      -o smtpd_tls_wrappermode=yes
      -o smtpd_sasl_auth_enable=yes
      -o smtpd_reject_unlisted_recipient=no
      -o smtpd_client_restrictions=$mua_client_restrictions
      -o smtpd_helo_restrictions=$mua_helo_restrictions
      -o smtpd_sender_restrictions=$mua_sender_restrictions
      -o smtpd_recipient_restrictions=
      -o smtpd_relay_restrictions=permit_sasl_authenticated,reject
      -o milter_macro_daemon_name=ORIGINATING
  8. Update the owner and group of /var/spool/postfix directory to become postfix as follows:
    sudo chown postfix:postfix /var/spool/postfix
  9. Restart the postfix service with the following command:
    sudo systemctl restart postfix

Installing SASL

Run the following command:

sudo apt-get install libsasl2-2 sasl2-bin libsasl2-modules

Configuring SASL

  1. Open the /etc/default/saslauthd file for editing.
  2. Search for START=no and change it like the following:
    START=yes
  3. Add the following entries just after preceding entry:
    PWDIR="/var/spool/postfix/var/run/saslauthd"
    PARAMS="-m ${PWDIR}"
    PIDFILE="${PWDIR}/saslauthd.pid"
  4. Search for OPTIONS="-c -m /var/run/saslauthd" and change it like the following:
    OPTIONS="-c -m /var/spool/postfix/var/run/saslauthd"
  5. Update the dpkg state using the following command:
    sudo dpkg-statoverride --force --update --add root sasl 755 /var/spool/postfix/var/run/saslauthd
  6. Create a symbolic link using the following command:
    sudo ln -s /etc/default/saslauthd /etc/saslauthd
  7. Restart the sasl service using the following command:
    sudo service saslauthd restart

Installing Dovecot

Run the following command:

sudo apt-get install dovecot-core dovecot-imapd dovecot-pop3d

The default location of the mail directory is /var/mail.

Configuring Dovecot

  1. Update the certificate location in the file /etc/dovecot/conf.d/10-ssl.conf to be as follows:
    ssl_cert = </etc/postfix/ssl/fullchain.pem
    ssl_key = </etc/postfix/ssl/privkey.pem
  2. Restart the dovecot service using the following command:
    sudo service dovecot restart

Related Posts
Basic Postfix Management
Creating an Email Alias
MailScanner with Postfix
Artifactory on Ubuntu with MariaDB

Requirement

  • Java 8
  • MariaDB 10.3.x

Preparing MariaDB

  1. Create the database called artdb using the following command:
    CREATE DATABASE artdb CHARACTER SET utf8 COLLATE utf8_bin;
  2. Add artifactory as the user to the newly created database using the following command:
    GRANT ALL on artdb.* TO 'artifactory'@'<HOST>' IDENTIFIED BY '<PASSWORD>';
    FLUSH PRIVILEGES;
    Token Description
    HOST The address of machine housing MariaDB
    PASSWORD The password for the artifactory user.

Installing Artifactory

  1. Add the artifactory repository to your source list.
    echo "deb https://jfrog.bintray.com/artifactory-debs <DISTRIBUTION> main" | sudo tee -a /etc/apt/sources.list
    Token Description
    DISTRIBUTION Use the following command to identify the destribution:

    lsb_release -c

    The sample output for ubuntu bionic distribution:

    Codename:       bionic
  2. Download jfrog public key using the following command:
    curl https://bintray.com/user/downloadSubjectPublicKey?username=jfrog | sudo apt-key add -
  3. Update your package list using the following command:
    sudo apt-get update
  4. Install the oss artifactory using the following command:
    sudo apt-get install jfrog-artifactory-oss

Artifactory Service Commands

Objective Command
Checking service status sudo service artifactory status
Starting the service sudo service artifactory start
Stopping the service sudo service artifactory stop
Restarting the service sudo service artifactory restart

Accessing The Artifactory from the Browser

  1. Use the following address to access the artifactory application:
    http://localhost:8180/artifactory
  2. Use the following default credentails:
    Field Value
    Username admin
    Password password

    It is recommended to change the admin password after installation but you can do it after hooking it to MariaDB.

Using the MariaDB Prepared Earliear

Variable Value
$ARTIFACTORY_HOME /var/opt/jfrog/artifactory
  1. Using the terminal, change the directory to $ARTIFACTORY_HOME/tomcat/lib and execute the following:
    sudo wget https://downloads.mariadb.com/Connectors/java/connector-java-2.4.4/mariadb-java-client-2.4.4.jar

    You can visit https://mariadb.com/downloads/#connectors for a different version of java client.

  2. Copy $ARTIFACTORY_HOME/misc/db/mariadb.properties to $ARTIFACTORY_HOME/etc/db.properties.

    This will replace the default db.properties that is using derby as the database.

  3. Update the following fields in the db.properties:
    Field Value
    url jdbc:mariadb://<HOST>:<PORT>/artdb?characterEncoding=UTF-8&elideSetAutoCommits=true&useSSL=false&useMysqlMetadata=true
    password The password you've used on Preparing MariaDB section.
    Token Value
    HOST The host you've indentified on Preparing MariaDB section.
    PORT This is the port where MariaDB is listening (i.e. 3306 or 3307).
  4. Restart the artifactory service using the following command:
    sudo service artifactory restart

Schedule Certbot-Auto to Auto Renew Weekly with NGINX

  1. Create the file in /etc/cron.weekly/certbot-renewal using the following command
    sudo vi /etc/cron.weekly/certbot-renewal
  2. Place in the following in the file and save it:
    #!/bin/sh
    
    /usr/sbin/certbot-auto renew --no-bootstrap --no-self-upgrade --post-hook "service nginx restart"
  3. Change the mode of file to 755 using the following command:
    sudo chmod 755 /etc/cron.weekly/certbot-renewal

Securing Ubuntu SSH

  1. Update the /etc/ssh/sshd_config file to have the following added:
    PermitRootLogin no
  2. Install fail2ban using the following command:
    sudo apt-get install fail2ban
  3. Create the file /etc/fail2ban/jail.d/jail-debian.local file to have the following:
    [sshd]
     enabled = true
     port = ssh
     filter = sshd
     logpath = /var/log/auth.log
     maxretry = 6
     bantime = -1
    
  4. Restart the service using the following command:
    sudo service fail2ban restart

See Unbanning an IP

Installing Nginx in Ubuntu

Nginx is a lightweight HTTP server, reverse proxy and email proxy server.

Pre-requisite

  • Already running Ubuntu platform.

Procedure

  1. Sign-in to your machine with the non-root user but a sudoer.
  2. Install Nginx with the following command using the terminal:
    sudo apt-get install nginx
  3. When you are asked Do you want to continue [Y/n]? press Enter and wait for it complete.

Validation

On the terminal run the following command:

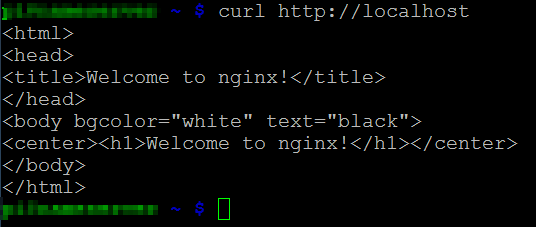
curl http://localhost

If the installation was successful you will see  something similar to the following output:

If the output is not similar to the output above, most probably that the Nginx was not started after the installation. To start it, use the following command and repeat the curl command:

sudo service nginx start
Newer posts »