Extremely Serious

Author: ron (Page 32 of 33)

Powershell Behind Proxy

Using the default network credentials

(New-Object System.Net.WebClient).Proxy.Credentials = [System.Net.CredentialCache]::DefaultNetworkCredentials

Using a different credentials

Using Get-Credential

(New-Object System.Net.WebClient).Proxy.Credentials = Get-Credential

Using NetworkCredential Object

(New-Object System.Net.WebClient).Proxy.Credentials = New-Object System.Net.NetworkCredential(<username>, <password>)

Note: You can add any one of these to your powershell profile to allow it to have network connectivity by default using proxy.

Calling Web Service without Generating Stubs (JAX-WS API)

Introduction

Normally calling a SOAP WebAPI requires the developer to access WSDL then based on it generates the stubs linked to a particular server. After generating it, we need to compile those to make them ready to be used. The problem with that one is. Do we use the same server for development, testing and production? If yes, we need to regenerate the stubs for testing and if we are satisfied with the testing. We need to regenerate the stubs for production. Wait? The one tested is not really the one going to production. The simplest way to do is not to generate the stubs but understand how the soap message was structured. If we know the structure of the SOAP message (i.e. SOAP UI can be used here), then we can create it by hand. The following is the sample of assembling a SOAP message for invoking the evaluate method from the StudioService endpoint of PolicyCenter 7 (i.e. One of the Centers of Guidewire) using Java.

Code 1. Using JAXWS API with Java

import java.util.Iterator;

public class GWStudioService {

    public static void main(String[] args) throws SOAPException, IOException {
        String endpointUrl = "http://localhost:8180/pc/ws/gw/internal/webservice/studio/StudioService";
        String targetNamespace = "http://guidewire.com/pl/ws/gw/internal/webservice/studio/StudioService";

        QName serviceName = new QName(targetNamespace,"evaluateGosu");
        QName portName = new QName(targetNamespace,"StudioServiceSoap12Port");

        /** Create a service and add at least one port to it. **/
        Service service = Service.create(serviceName);
        service.addPort(portName, SOAPBinding.SOAP12HTTP_BINDING, endpointUrl);

        /** Create a Dispatch instance from a service.**/
        Dispatch dispatch = service.createDispatch(portName,
                SOAPMessage.class, Service.Mode.MESSAGE);

        /** Create SOAPMessage request. **/
        // compose a request message
        MessageFactory mf = MessageFactory.newInstance(SOAPConstants.SOAP_1_2_PROTOCOL);

        // Create a message.  This example works with the SOAPPART.
        SOAPMessage request = mf.createMessage();
        SOAPPart part = request.getSOAPPart();

        // Obtain the SOAPEnvelope and header and body elements.
        SOAPEnvelope env = part.getEnvelope();
        SOAPHeader header = env.getHeader();
        SOAPBody body = env.getBody();

        String authNS = "http://guidewire.com/ws/soapheaders";

        SOAPElement auth = header.addChildElement("authentication", "auth", authNS);
        SOAPElement username = auth.addChildElement("username", "auth");
        username.addTextNode("su");
        SOAPElement password = auth.addChildElement("password", "auth");
        password.addTextNode("gw");

        // Construct the message payload.
        SOAPElement operation = body.addChildElement("evaluateGosu", "stud",
                targetNamespace);
        SOAPElement value = operation.addChildElement("code", "stud");
        value.addTextNode("7072696e74282248656c6c6f20776f726c642229");
        request.saveChanges();

        System.out.println("Request\n");
        request.writeTo(System.out);

        SOAPMessage response = dispatch.invoke(request);

        System.out.println("\n\nResponse\n");
        response.writeTo(System.out);

        SOAPPart inSOAPPart = response.getSOAPPart();
        SOAPEnvelope inEnv = inSOAPPart.getEnvelope();
        SOAPBody inBody =  inEnv.getBody();

        Iterator inGosuResp = inBody.getChildElements(new QName(targetNamespace, "evaluateGosuResponse"));
        Iterator inReturn = inGosuResp.next().getChildElements(new QName(targetNamespace, "return"));
        Iterator inEntries= inReturn.next().getChildElements(new QName(targetNamespace, "Entry"));

        while (inEntries.hasNext()) {
            SOAPElement inEntry = inEntries.next();

            System.out.println(">");
            System.out.println(inEntry.getElementName().getLocalName());
            System.out.println(inEntry.getTextContent());
        }
    }
}

Output 1: Sample output of running code 1

<soap12:Envelope xmlns:soap12="http://www.w3.org/2003/05/soap-envelope"><soap12:Header/><soap12:Body><evaluateGosuResponse xmlns="http://guidewire.com/pl/ws/gw/internal/webservice/studio/StudioService">

<return>

<Entry>48656C6C6F20776F726C640D0A</Entry>

<Entry/>

</return>

</evaluateGosuResponse></soap12:Body></soap12:Envelope>

To understand the output of the entry we can use the following online Hex to String converter.

https://codebeautify.org/hex-string-converter

Reference:

https://axis.apache.org/axis2/java/core/docs/jaxws-guide.html#DispatchClient

Singleton with Variable State

Looking at the following SingletonUtil class we know we can call generateXML method safely.

Code 1: SingletonUtil class for Studio Terminal

static class SingletonUtil {
  var _sbString : StringBuilder
  
  private static var _SELF : SingletonUtil as Instance = new SingletonUtil()

  private construct() {
    _sbString = new StringBuilder()
  }
  
  function generateXML(text : String) : String {
    _sbString.append("")
    _sbString.append(text?:"")
    _sbString.append("")
    var output = _sbString.toString()
    using(_sbString as IMonitorLock) {
      _sbString.delete(0, _sbString.length())
    }
    return output
  }
}

If we generate the XML like the following:

Code 2: GenerateXML via single thread.

print(SingletonUtil.Instance.generateXML("test"))

The output will be as expected and we can say it is safe:

Output 1

<text>test</text>
<text>test</text>
<text>test</text>

We are complacent that everything is working good since we can run it and can generate the expected Output 1. But don’t forget we are running it in a single thread. Thus we can say that this code is safe for single thread.

Lets try the same but this time with 10 threads and we are expecting the output to be like this:

Output 2

<text>test</text>
<text>test</text>
<text>test</text>
<text>test</text>
<text>test</text>
<text>test</text>
<text>test</text>
<text>test</text>
<text>test</text>
<text>test</text>

Run the following code in terminal:

Code 3: GenerateXML via multithread.

for (var idx in (1..10)) {
  var thread = new Thread(new Runnable() {
    override function run() {
      print(SingletonUtil.Instance.generateXML("test"))
    }
  })
  thread.start()
}

We will have a hard time generating our expected output this time. And we can say that this not thread-safe. There are three things we can do about this.

1.) If we don't have the source code, we can use locking on the client code. Let's use IMonitorLock for the simplicity and run it in studio terminal. The updated client code can be like the following and can generate Output 2:

Code 4: GenerateXML via multithread with locking.

for (var idx in (1..10)) {
  var thread = new Thread(new Runnable() {
    override function run() {
      var inst = SingletonUtil.Instance
      using(inst as IMonitorLock) {
        print(inst.generateXML("test"))
      }
    }
  })
  thread.start()
}

2.) If we have the source code and can update it, we can make the whole generate XML method to be synchronized like the following and use Code 3 to generate Output 2:

Code 5: SingletonUtil class for Studio Terminal with the whole generateXML is locking.

static class SingletonUtil {
  var _sbString : StringBuilder
  
  private static var _SELF : SingletonUtil as Instance = new SingletonUtil()

  private construct() {
    _sbString = new StringBuilder()
  }
  
  function generateXML(text : String) : String {
    using(_sbString as IMonitorLock) {
      _sbString.append("")
      _sbString.append(text?:"")
      _sbString.append("")
      var output = _sbString.toString()
      _sbString.delete(0, _sbString.length())
      return output
    }
  }
}

3.) If we have the source code and can update it, try to remove the variable state like the following and use Code 3 to generate Output 2:

Code 6: SingletonUtil class for Studio Terminal without shared state.

static class SingletonUtil {
  private static var _SELF : SingletonUtil as Instance = new SingletonUtil()

  private construct() {
  }
  
  function generateXML(text : String) : String {
    var _sbString = new StringBuilder() 
    _sbString.append("")
    _sbString.append(text?:"")
    _sbString.append("")
    var output = _sbString.toString()
    return output
  }
}
Refactoring difficult class to test to testable in Gosu

Use case

Normally if we like to create a utility class we normally implement it with static methods.

Problem

This is good if we can write unit tests on it. But most of the time this is not the case since it is difficult to write a unit on it. Specially, if the utility class that have a lots of static methods inside that depends on each other. For example, the following piece of code (i.e. Code 1) even though small authoring a test could be difficult.

Code 1. Small class that cannot be tested easily.

package example

uses java.lang.Math

class SampleCodeWithStaticMethods {

private construct() {}

static function myMethod() {
 var value = someAction() + 10
 print(value)
 }

static function someAction() : int {
 return (Math.round(Math.random()*100) as int) + 100
 }

}

Imagine write a unit test for myMethod. It is almost impossible because the method depends on someAction which is also a static method that returns random integer.

We need to refactor this to make it testable. The first thing we can do is identify if there are other static methods being called that are not a member of the class and make a separate non-static method for them. From code 1, those static method calls are:

- Print
- Math.round
- Math.random

Call those new member instance methods in place of the static method call. Making them contained in a separate method allows us to bypass them by overriding on a child class (i.e. basic OOP principle).

The next thing is remove all the static modifiers to convert all of them to member instance methods.

The refactored code would be like the following code.

Code 2. Refactored to use non-static methods

package example
uses java.lang.Math

class SampleCodeWithoutStaticMethods {

//Contains the call the to static print method.
 function output(value : int) {
 print(value)
 }

//Contains the call the Math.round and Math.random.
 function random() : int {
 return (Math.round(Math.random()*100) as int)
 }

function myMethod() {
 var value = someAction() + 10
 //Calls the member method that contains the static print method.
 output(value)
 }

function someAction() : int {
 return random() //Calls the member method that contains the static Math.round and Math.random method.
 + 100
 }

}

Now testing myMethod becomes so trivial (i.e. Code 3) using the very old behaviour of OOP (i.e. being polymorphic). The key is the inner class SampleCodeWithoutStaticMethodsMyMethod where we overrode someAction and output instance methods.

The someAction method now just return 25 which makes it more consistent than its original random behaviour.

The output method is just collecting what's being passed to it to result field instead of printing it.

Code 3. Unit test for myMethod

package example

uses gw.api.system.server.Runlevel
 uses gw.testharness.RunLevel

@gw.testharness.ServerTest
 @RunLevel(Runlevel.NONE)
 class SampleCodeWithoutStaticMethodsTest extends gw.testharness.TestBase {

class SampleCodeWithoutStaticMethodsMyMethod extends SampleCodeWithoutStaticMethods {
 var result : int

override function someAction() : int {
 return 25
 }

override function output(value : int) {
 result = value
 }
 }

function testMyMethod() {
 var testObj = new SampleCodeWithoutStaticMethodsMyMethod()
 testObj.myMethod()
 assertEquals(35, testObj.result)
 }

}

Registering Cygwin – NGINX as a Windows Service

The following procedure must be ran on an elevated cygwin terminal.

1. Run the following command and accept the defaults.

cygserver-config

2. Register the nginx as a service with the following command:

cygrunsrv --install nginx --path /usr/sbin/nginx.exe --disp "CYGWIN nginx" --termsig QUIT --shutdown --dep cygserver

Making your home Nginx on Raspberry Pi accessible from the Internet

Pre-requisites

  • Nginx installed on your Raspberry Pi or you can follow the procedure from here.
  • A router that can forward ports.

Procedure

  1. Access your router firmware and look for port forwarding configuration.
  2. Then configure your router port 80 to be forwarded to your local Raspberry Pi with Nginx with static IP also with port 80 (i.e. where Nginx is listening by default).

Port Forwarding Procedures

Telecom - Technicolor Gateway TG582n

Port Forwarding using Telecom Technicolor Gateway TG582n

  1. Sign in to your Telecom Technicolor Gateway TG582n as Admin.
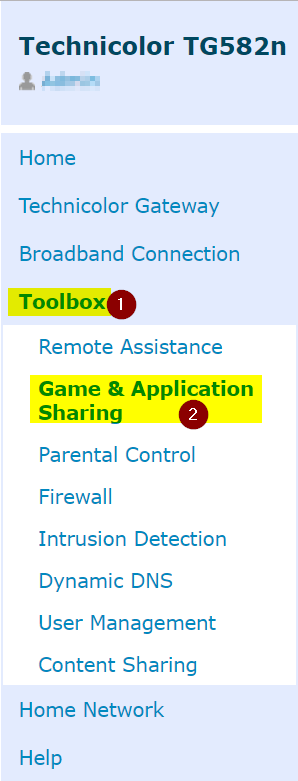
  2. Click Toolbox and then the Game and Application Sharing menu.
  3. At the bottom of the page select the Create a new game or application menu.
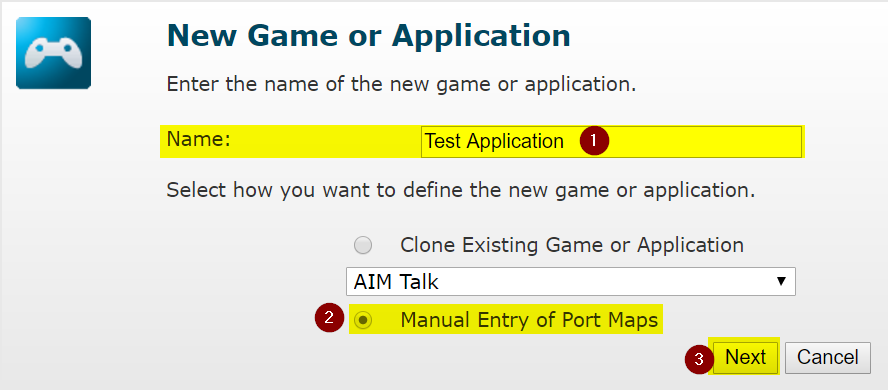
  4. Type in a name (e.g. Test Application), select Manual Entry of Port Maps then click the Next button.
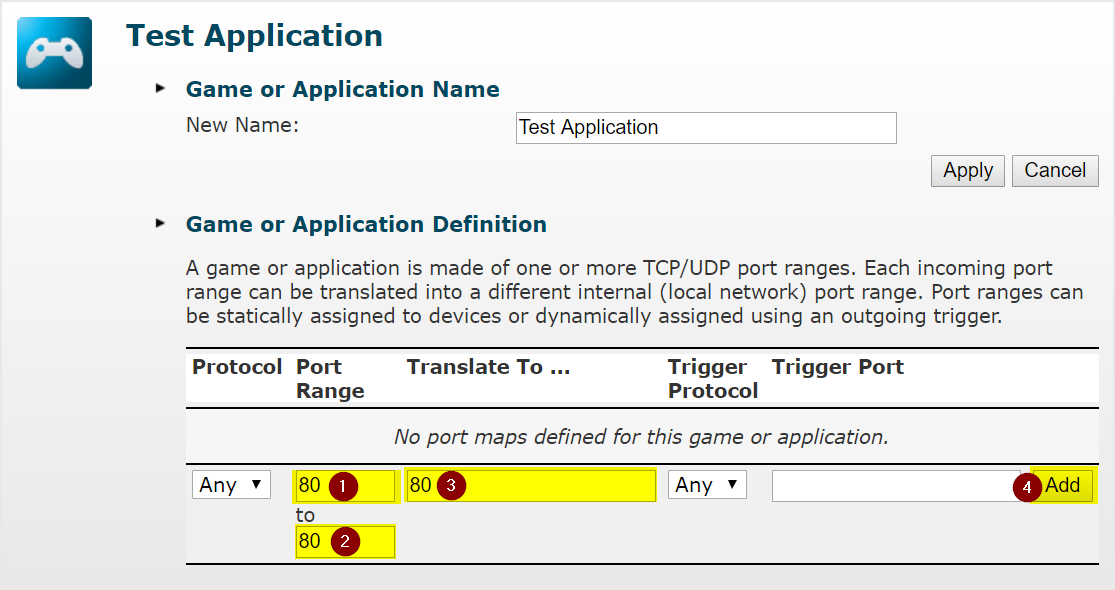
  5. If your interest is to forward port 80 from the router to an internal port 80 on the local network. Fill up the port range from 80 to 80 and to be translated to a local port 80 and  then click the Add button.
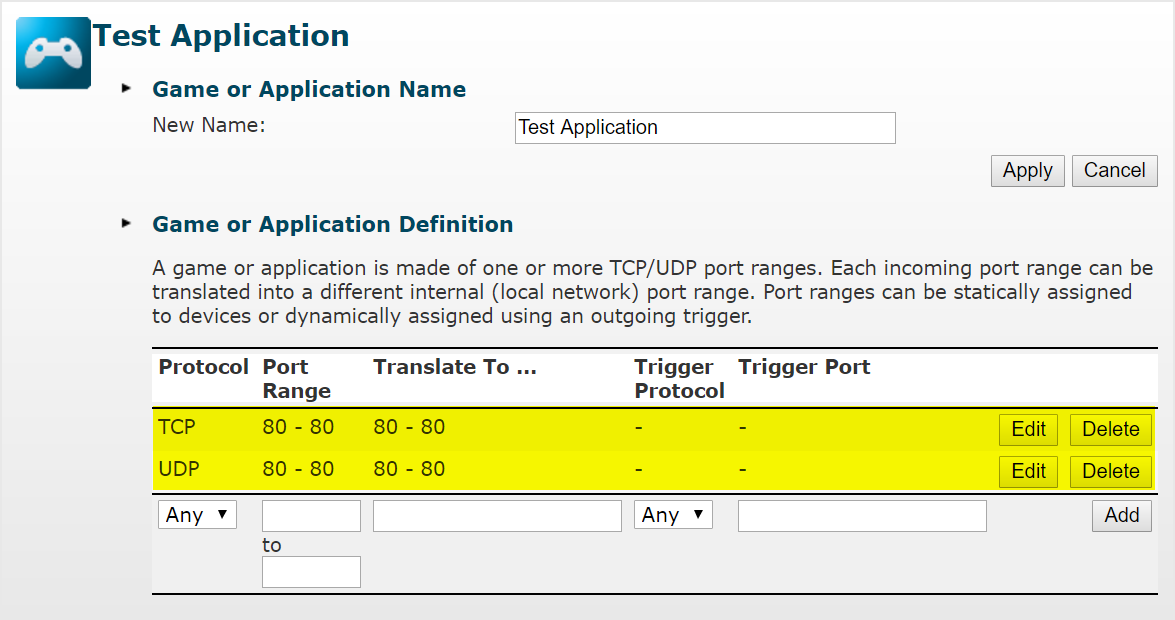
  6. After clicking the add button you will see two entries were added since we leave the value any in the protocol field.
  7. Click again the menu from step 2 and at the bottom of the page click the Assign a game or application to a local network device menu.
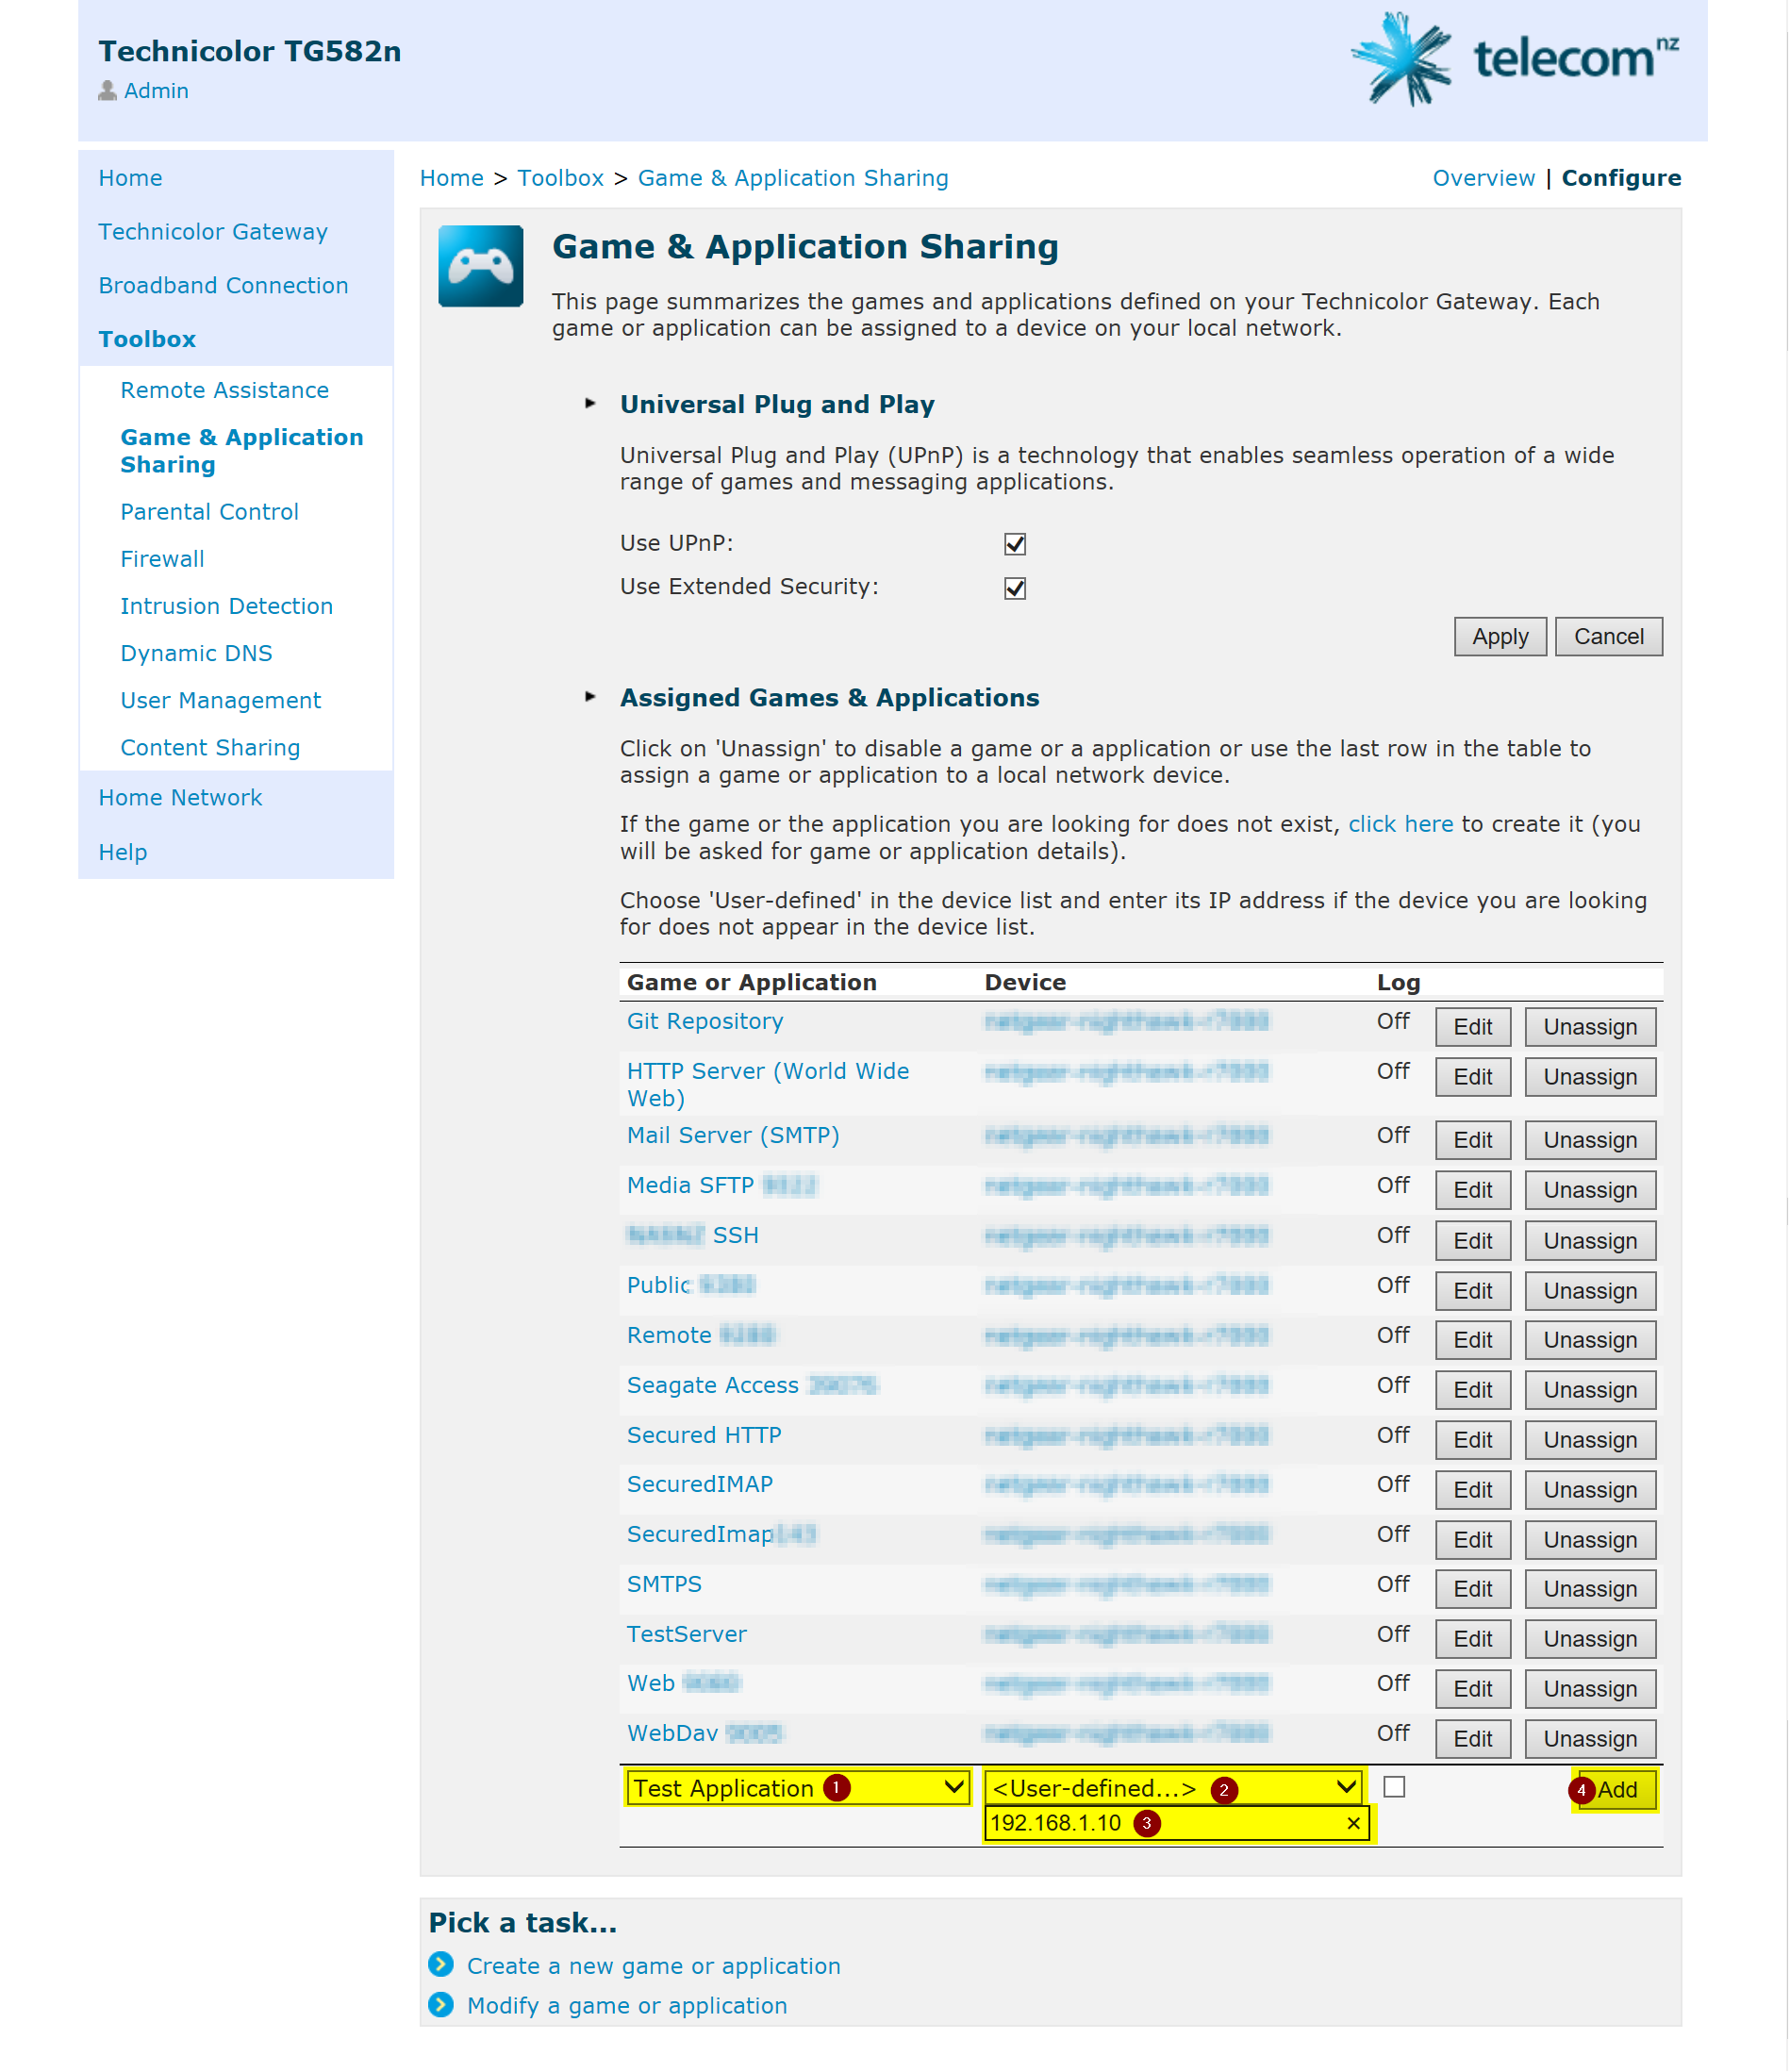
  8. Select the application (i.e. Test Application if you use the example from step 4) we've created earlier for the Game or Application field and select <User-defined...> for the Device field and type in the static IP of your local device (e.g. 192.168.1.10) to the additional field. Then click the Add button.
  9. After clicking the add button and no error you will see your application as a new entry in the list of the current page.
« Older posts Newer posts »